
Painting the Traditional Way
– Part 3 –
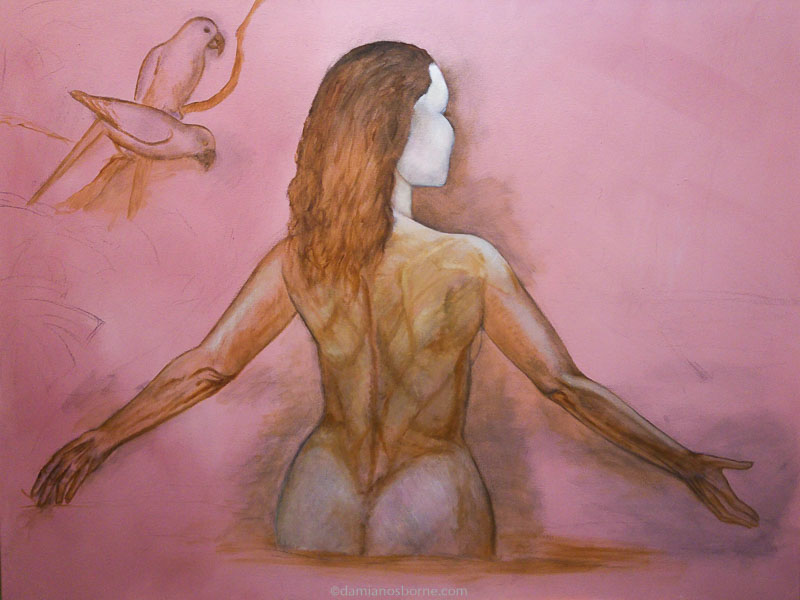
The Dead Layer
After completing the underdrawing in charcoal, and going over the lines with a burnt sienna imprimatura, it was time to refine the anatomy and work on the ‘dead layer’ or underpainting stage.
Refining the underpainting (the anatomy)
In the next step, I started refining the underpainting a little more.
Using burnt sienna, raw umber and some ultramarine blue, I refined the drawing of the woman’s anatomy, paying special attention to her spine and scapular, the trapezius muscle of the back, the buttocks and the arm muscles.
By building up the bone and muscle structure of her body, I wanted it to look more realistic and accurate.
Once I was happier with the way the underpainting was looking, I started on the ‘dead layer’ of her face.

What is the ‘dead layer’ in oil painting?
The dead layer is a traditional oil painting technique where the artist builds up the higher tonal values of the painting by adding white over the underpainting.
The lighter values are more opaque and more thickly applied, whereas the the darker areas are more transparent and more thinly applied, thus allowing more of the underpainting to show through. In the darkest areas, no white is added.
Painting a monochromatic ‘dead layer’ or grisaille is a useful step to creating more realistic forms, and build up contrast and tonal values (the lights and darks) without having to worry about chroma or hue (colour).
By using a light value (lots of opaque white), layers of glazed colour can be added afterwards on top of the white, causing the colours to refract more deeply and appear more glossy. Glazes appear to have a higher chroma over a lighter ground.
The dead layer was a typical Flemish Painting technique of the 15th Century. It’s nicknamed the ‘dead layer’, because the faces always look so ghostly white, or zombie-like in this greyed or muted painting stage.
Grisaille is the term used by the Academic French artists for the traditional way of creating an underpainting in monochrome.
Check out more on the grisaille in Painting the Figure – Part 1.
Instead of using only white, I warmed it up a little with some permanent rose, red ochre, burnt sienna, and gold ochre.

Painting over the burnt sienna underpainting this way allows the previous layers to show through. You can still see the pink ground and the sienna underpainting underneath.
I tried to build up the forms using these halftones of opaque lights and semi-transparent mid-tones.
Learn more about Painting the Halftones in another figure painting series I did, where I explain colour temperatures of the skin in more detail.
By blending with a soft filbert brush, I could soften the effect of the harsh lines of the drawing and start building up the illusion of rounded, palpable flesh.

During this session, I ran out of time unfortunately and didn’t complete the right arm.
I also had some paint on my palette, so I just brushed it onto right-hand corner of the painting. For further reading, see: Exploring the Flemish method, part 3: painting the dead layer by Carrie Lewis .
Working on the background
When I was able to come back to the painting in a few days time, I completed the right arm and painted the birds in a basic middle layer of red and blue. I also streaked my left-over paint in the empty spaces of the picture:

I decided to that I needed to get more work done on the background, as I knew that it would influence the subject in many ways, particularly in the way that I wanted to do the edges of her body.
By painting the background first partially, I would have more control over that.
Secondly, I needed a clearer vision of what I wanted in the background because that would influence the subject in the sense of spacial composition – how she walked through, lived and breathed within the scene — and also in terms of light and colour.
How I painted the shadows and highlights of her body would be entirely influenced by what was happening in the environment around her.
So I cut some Philodendron leaves from the garden and put them in a vase with water on my table.
With some raw umber and a touch of Liquin and white spirit, I took a long-handled fine brush, and drew the outlines of the leaves directly with the thin paint. I scumbled in the shading with a soft bristle brush.
I love the green/brown transparent hue of raw umber as an undertone for foliage.

I took the rest of my raw umber paint and used it up around the lower part of her body.

In the next post, I explain the process of painting the background and how I paint water. Should the artist paint the background before painting the main subject or foreground? Check out Painting the Traditional Way – Part 4 – The Background.
Thanks for reading and please comment below or ask me any questions you may have regarding these painting techniques.
You can also check out some more of my figure paintings here.

- Pencil Sketching on Vacation - 3rd April 2022
- Making Vine Black Oil Paint (and Drawing Charcoal) - 28th January 2022
- Making Graphite Oil Paint - 25th November 2021