
Making Your Own Refined Linseed Oil
(Like the Old Masters)
- 1 | Linseed oil and yellowing
- 2 | Why make your own refined linseed oil?
- 3 | The salt and sand linseed oil refining process
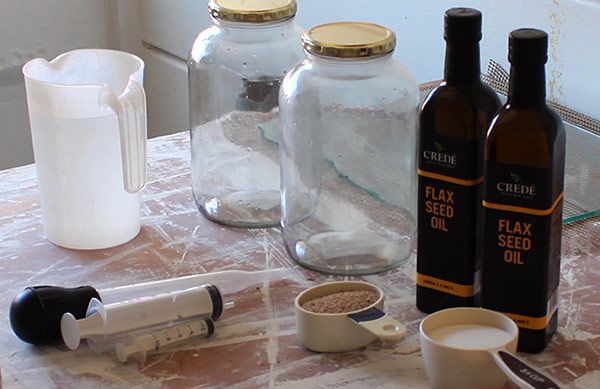
- 4 | What you’ll need for refining linseed oil with the salt and sand method:
- 5 | How to refine linseed oil with the salt and sand method:
- 6 | What is the difference between cold-pressed, heat-bodied, sun-bleached, stand, and burnt-plate linseed oil for oil painting?
Making your own refined linseed oil as a medium for oil painting or for paint-making, is a valuable process passed down from the Old Masters.
Linseed oil is derived from the flax plant. The best oil for painting (and for your health) is cold-pressed below 40°C from the dark brown flaxseeds.
It must contain no added anti-oxidants nor be mixed with sunflower or canola oils. It must be 100% flaxseed oil.
You can usually obtain good quality cold-pressed flaxseed from the health store. (The organic version isn’t strictly necessary.)
Once you’ve found a good quality oil to start with, there a many benefits to refining linseed oil yourself.
Refining linseed oil by hand is the carrying out of an age-old traditional practice. It was usually done by the artist himself (or his apprentice) before grinding pigments for paint.
Whenever I learn to make my own art materials, I gain a far more complete understanding of the medium and the potential nuances intrinsic to that medium.
What is commercially available in the art store, is only a limited, and often low-grade version due to mass-production.
Commercially available linseed oil is often hot-pressed or steamed to increase the oil yield, then washed with acid in a vacuum at 80°C (degumming process), then neutralized by adding alkali (sodium hydroxide), bleached with bentonite clay, and dewaxed with diatomaceous earth.
This industrial process results in an oil that is ultra-refined, but lacks ‘life’ and character. It is thin and pale, brushstrokes are lost; it has a soft, gel-like paint-film, and dries really slowly because it’s slow to oxidize.
Linseed oil and yellowing
Ever noticed the gross, sticky yellow oozings near the lids of commercial brands of paints when you’ve kept them for a few years? That’s clear evidence the paints you buy are prone to yellow over time.
The yellow colour of hand-refined linseed oil is sometimes misleading. A pale oil doesn’t always mean a non-yellowing oil. And the yellow colour of the oil can also be fugitive.
What is most important, is the colour of the oil when it dries or polymerizes. Therefore, it’s important to do yellowing tests. Which takes time.
Commercial oils are often bleached which doesn’t mean it won’t yellow over time. What causes yellowing in the oil are the waxy phospholipids and free fatty acids in the mucilage. So if the refining process doesn’t get rid of these impurities, no amount of bleaching actually helps.
To test a commercial alkali-refined or cold-pressed linseed oil for impurities, simply mix the oil with water in a jar and watch what happens. The polarized molecules of water draws the water soluble fatty acids out (that cause yellowing and a brittle paint film) which sits as a waxy white later beneath the oil.
Alternatively, you can leave the oil overnight in the fridge. If it becomes cloudy, it still contains water-soluble mucilage.
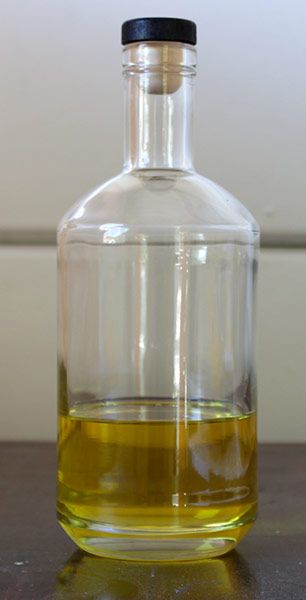
An oil refined properly of its volatile organic compounds (VOCs) through the salt and sand method, and left in the sun on a sunny windowsill for 3 months, will eventually become a pale straw colour.
An alkali refined oil can sometimes darken when exposed for long periods in the light due to the remaining VOCs which are formed when the fatty acids are broken down by oxygen and light, i.e. autoxidation.

Why make your own refined linseed oil?
• Making your own refined linseed oil gives one the opportunity to learn how the Old Masters did it, and how it influenced their painting practice; how it affected the quality and unique character of their paints versus what we commercially use today.
• It gives you a more ‘hands-on’ approach regarding your painting craft and the ability to be in control of the quality/characteristics of the oil. How viscous or lean do you want your oil? How fast/slow drying?
• Save costs on really expensive commercial artist’s brands of refined linseed oil. Hand-refined linseed oil simply isn’t available commercially.
• Debunks the myth that linseed oil yellows badly over time, or that it’s a slow drier. Hand-refined linseed oil aged in the light is virtually non-yellowing, and dries quickly. Far quicker than commercial oil (to which driers and additives are often added). Commercial oil is not refined to enhance oxidation, but to slow it down. Hence, slower drying.
• Also debunks the myth that you need to use solvents. With hand-refined linseed oil, you don’t need to use solvents in your painting practice. So it simplifies the use of mediums and is also safer to work with.
• Hand-refined linseed oil is far more elastic, has more body and has a stronger film strength than commercially available linseed oil. It dries quickly with good body, adhesion and gloss.
• Alkali-refined linseed oil, commonly available in art shops, does not retain the exciting characteristics and rheological potential of hand-refined oil because of the harshness of the industrial refining and bleaching process.
• The commercial bleaching process with bentonite clay creates an oil with a very pale colour, but this is no indication that the oil won’t in fact yellow over time.
• An oil that has been properly refined by hand, where the fatty acids have been removed, results in an oil that polymerizes more easily, is less acidic and less reactive to atmospheric moisture.
• Hand-refined linseed oil gives the artist or paint-maker a more nuanced approach when grinding pigments in oil because of the potential to modify the working characteristics of the oil through controlling the refining process. This results in a more personally customized paint product.

The salt and sand linseed oil refining process
Refining linseed oil with the salt and sand method has been on record since Sir Théodore de Mayerne wrote his treatise (simply called The De Mayerne manuscript) in 1620 -1632 based on conversations with painters such as Rubens, van Dyck, Mytens, Paul van Somer, and Cornelius Johnson.
I learnt about this technique through the fascinating research done by artist Tad Spurgeon. I’m really thankful for the time he took to answer my many questions. So be sure to check out his website where you can purchase his book: Living Craft.
You can watch the video above to see how I used the salt and sand method. But I’ll give a brief summary below.
What you’ll need for refining linseed oil with the salt and sand method:
• Two large glass 2 litre mason jars with screw-on lids.
• 500 ml cold-pressed unrefined flaxseed (linseed) oil. Make sure it is pure flaxseed oil. No added antioxidants or blends with sunflower oil etc. It doesn’t have to be organic, just good quality. Experiment with different brands.
• Approximately 2 cups of coarse silica sand such as pool filtration sand. Wash off the dust and strain it.
• Approximately 3 cups of salt. I use coarse sea salt.
• A litre jug of hot (50-60°C) tap water (preferably softer water) or in doubt, use rain water heated in the kettle.
• Large wooden spoon for stirring.
• A bulb or turkey baster. Small syringe may also be helpful.
• Palette knife or spoon might be useful.
• A small funnel with a piece of cloth or cotton wool to act as a filter.
• Electric hand-blender.
• Thermometer to check water temperature (a nice-to-have).
• Paper towel.
How to refine linseed oil with the salt and sand method:
This is personally my preferred method of refining linseed oil.
• Heat up 1 litre of filtered rain water in the kettle until it gets to about 50-60°C.
• Pour the hot rain water into a plastic jug and dissolve a 3/4 cup of salt in the jug of warm rain water by stirring with the wooden spoon.
• In a previously warmed 2 litre glass mason jar, pour your 500ml of flaxseed oil.
• Pour the hot salty rain water into the jar of flaxseed oil.
• Use a hand blender for about 30 seconds to thoroughly mix the oil and water together. It should form a milky emulsion.
• Pour in half a cup of washed silica pool filter sand mixing with the oil.
• Close the lid of the jar tightly, making sure there’s no sand grains caught in the thread of the jar or it will leak (use a paper towel to wipe clean), then shake it vigorously like you would a giant cocktail shaker. Shake for a minute or two.
• Set the jar down and watch how the salty water causes the oil to separate to the top. Give it a few minutes. Then shake again.
• Repeat shaking the jar for a few minutes and let it settle again. Do this about 5 times.
• Then you can leave the jar on a sunny windowsill for a few days.
• After a few days, you might start to see a layer of mucilage form between the oil and water. Add cold water very slowly and gently to the oil, pouring the water over a spoon or palette knife so that it runs down the inside sides of the jar and disturbs the oil as little as possible. This should release some of the mucilage from the oil.
• Let the oil and water settle again for an hour or two if you feel it’s necessary.
• Use a bulb baster to carefully remove the oil to another 2 litre mason jar, leaving the water and mucilage behind. Make sure you don’t suck up any of the mucilage with the oil.
• To get the last bits of oil, fill the jar up with water up to the top.
• Consolidate the left over oil containing the mucilage into a separate jar. After a while, you may have quite a bit of leftover oil.
• Repeat the whole process three or four times with the clean oil.
• After washing with salt and sand at least 3 times, it’s time for a water-only rinse. Start by pouring a litre of hot, filtered rain water into the jar containing the clean oil, but without any salt.
• Use the immersion blender to mix up the oil and water for about 30 seconds, creating a milky white emulsion. This time, without salt in the water, it may take much longer to separate, if at all.
• Leave it on a windowsill for a few days.
• If after a while, the oil and water still haven’t separated, it’s not a big deal. Cover the top of the jar with a piece of cloth and hold in place with an elastic band. Place the jar in the freezer overnight.
• In the morning, the water in the jar should be frozen, with the oil sitting on the surface. If you find that the oil and water still haven’t separated properly, put the jar on a sunny windowsill again to defrost. This will allow the oil to separate better. Then freeze overnight again.
• Take the jar out of the freezer the next day. The water and water-soluble mucilage should be frozen, with the pale yellow oil sitting on top. Pour the oil through a filter (made with a funnel and some cloth or cotton wool) into another jar. Try to leave any melted water and mucilage behind. Consolidate the left over oil/mucilage into your ‘left-overs’ jar, or discard it as you see fit.
• Repeat the water-only rinse process again, with freezing overnight.
• Once you’ve rinsed the oil with pure rain water at least twice, and you’ve left it overnight in the freezer, pour the oil (through a filter) into a clear bottle/jar. Make sure it is very clean. No water or mucilage must be in this oil.
• You can now either heat the oil gently to remove the trapped water, or leave it on a sunny windowsill (with a cloth lid) for a few weeks to evaporate the water.
• To check if the all the mucilage/water has been removed from this oil, you can put the jar/bottle of oil in the fridge for a few hours. If it’s becomes cloudy, there’s still water in the oil. You’ll have to heat it further, or leave it to stand exposed to oxygen and sunlight for longer.


What is the difference between cold-pressed, heat-bodied, sun-bleached, stand, and burnt-plate linseed oil for oil painting?
Cold-pressed linseed oil
Cold-pressed linseed oil is oil that hasn’t been heated in any way. This is basically what you’re left with after doing the salt and sand refining method. It’s different to alkali-refined linseed oil which you buy in the art store.
It is the most fluid (thinner viscosity) of the oils, has great flexibility and ‘wetting’ ability when mixing with dry pigment to make oil paints.
However, it is fairly slow-drying (although washing with salt makes a much faster drying oil than linseed oil bought from the art store) and prone to yellowing.
It also has a tendency to make the painting darken when placed in a dark room. This process can be reversed by moving the painting to a sunny room.
Heat-bodied oil
According to Tad Spurgeon, the best oil for grinding pigment and for general use, is a slightly heat-bodied oil. There is a lot of variation here.
But generally, cold-pressed refined linseed oil can be heated to about 100-150°C (water evaporates) for about an hour. This temperature is low enough to not cause the oil to darken, and thickens only slightly. This makes an oil which dries more quickly.
You can of course, experiment and heat the oil for longer and at higher temperatures. Heating the oil to about 150°C for 4 hours, eliminates the hydroperoxides in the oil, which can be a major source of yellowing.
But heating for longer starts making the oil more viscous, meaning it’s probably better suited for use as a medium rather than for grinding pigments.
Linseed oil turns medium red by the time the Volatile Organic Compounds (VOCs) are all gone at 150°C. But, this colour is fugitive.
Heating linseed oil with calcite also tends to minimize the byproducts of oxidation that cause yellowing. One can create oils with various rheologies through experimentation.
Sun-bleached or sun-thickened linseed oil
Sun-bleached or sun-thickened linseed oil is another traditional method of purifying, bleaching and thickening the oil through exposure to the sun.
This is one of the best oils for making mediums or for glazing with varying degrees of tackiness. Which means it’s also good for creating a ‘couch‘.
Oil which has been aged in the light has less tendency to yellow over time. It is somewhat viscous, dries quickly and levels out nicely. This is because the oil is partially polymerized and slightly oxidized by exposure to light and air.
One can simply leave a bottle or jar of cold-pressed refined linseed oil on a sunny windowsill for a few weeks. This will cause the oil to become paler. Use a piece of cheesecloth tied over the top of the jar to allow air into the jar and to keep insects and debris out.
Another popular way of making sun-thickened linseed oil, is to use a wide shallow dish like an enamel or Pyrex bowl, filled to about half an inch of linseed oil.
Place matches along the edge of the bowl to act as spacers for air to enter. Then cover with a glass lid and place in the sun for a few days.
Be aware of ants being attracted to the oil, and give the oil an occasional stir to prevent a skin forming on the surface.
The longer you leave it in the sun, the more thick and gloopy the oil will become.
One can also oxidize the oil faster by aerating with a fish tank air pump and an air-stone.
Sun-thickened oil can also be made in lead trays which speeds up the process and makes a faster-drying oil (dries faster than stand oil).
Stand oil
Stand oil is linseed oil which has been heated to over 300°C (modern stand oil is heated in a vacuum). This causes polymerization to occur and the oil thickens and darkens, creating a honey-like oil.
It is less yellowing than cold-pressed linseed oil, giving an enamel-like quality to paint, and dries with a tough, flexible film. Stand oil is best used for creating mediums and not for paint-grinding.
Burnt-plate oil
Burnt-plate oil is oil that has been heated until it basically ignites. The burnt oil becomes thick and viscous like molasses and is capable of forming threads a foot long when dipping a metal spoon into the oil.
It can be quite dangerous to make, as the oil can ignite spontaneously, setting fire to a whole village! Burnt-plate oil is usually used with print-making for making etching inks.
Thanks for reading, and if you have any questions, send me a comment below and I’ll try and help. I really recommend checking out Tad Spurgeon’s website to read more about refining your own oil. He has been really forthright with his information regarding my many questions and I am really grateful to him.

Check out my latest series of works The Sirens.

- What’s the Point of Creating When No One Cares? - 24th August 2025
- Fantasia No.6 in G minor (The Cockatrice) - 3rd May 2025
- Rebirth: Starting Over as an Artist — Part 1 - 17th April 2025
I just wanted to say thank you for your article on oils. I am no artist, and have only attempted oil painting three times now. The number of variants of oils for painting had left me bemused. Your article has cleared up and explained a lot, including what the refinement is doing or trying to do. I feel a lot happier and more comfortable with my oil choices now.
Many thanks
Mike
Thanks a lot Mike. I’m glad I could have helped. Don’t get caught up in too much of the noise out there. Just get to know your paints, brushes etc. Be aware of how they feel, react to your touch etc. You’ll learn intuitively through getting down to painting. The rest is just extra, and you’ll figure it out when the time comes. Sorry if this is a late reply. I didn’t know I had issues with my website’s comment section.
Regards,
Damian
Hi Damian,
Can you tell me what the salt and sand get’s out of the oil and how they does it?
Greetings!
Hi Lien, the salt and sand (silica) creates a negative charge which attracts the mucilage and seperates it from the oil. The sand traps the mucilage at the bottom of the jar.
Thanks so much for your answer!
Greetings!
hello,
i did it, about six months ago, because of the website of tad, oil begins to thicken nicely, and dries in about 2 to 3 days.
one question ’cause the blog of tad is down: recently, i wanted to taste the oil !! and is still salted, very salted,
did i missed something? is it normal? is it safe to use ?
Vincent
I did 1 deguming with vinegar, three washes with salt and 2 without salt like he said in his blog.
Maybe you had some mails with him about that ?
Regards.
Hi Vincent, sorry for the delayed reply. I was travelling through Namibia. Um, not sure about the salt taste, but if you freeze the oil/water mixture, then pour off the oil, or at least rinse a few times, perhaps that will help? To my mind, I would want the oil as pure as possible. Salt is hygroscopic, meaning it tends to absorb water, and this may affect your paint film.
Regards,
Damian
I’ve been a 18th century historical artist for 20 years now; and I am glad to find your site. I generally purchase traditional made linseed oil through natural pigments. They are indeed expensive for sun bleached linseed oil, but It’s worth it to get better painting and paint making results. thank you again for your website. Wayne Culbertson
Thank you so much for sharing this information. This will tak my oil painting experience to a new level.
Thanks a lot Terry. I’m actually going to write an updated oil making method soon. Regards, Damian