
Alla Prima Still Life Painting Demo
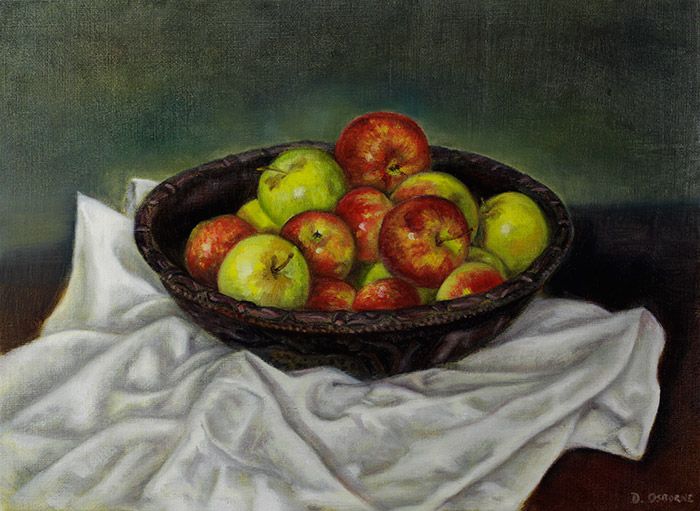
Painting an alla prima still life is a really valuable exercise for any artist. For this still life painting demo, I set up some apples in an African bowl. The painting was another still life commission for a collector in the U.K.
In my last post, I showed how to stretch a canvas for painting. I showed how to make a strainer frame and talked about the differences between a strainer and stretcher frame, and the pros and cons of each for stretching canvas.
I had a roll of ready-primed Belgian linen which I used for making my canvas.
After stretching the linen canvas, I gave it an additional coat of oil-based primer. Then I waited a few weeks for the primer to ‘cure’.
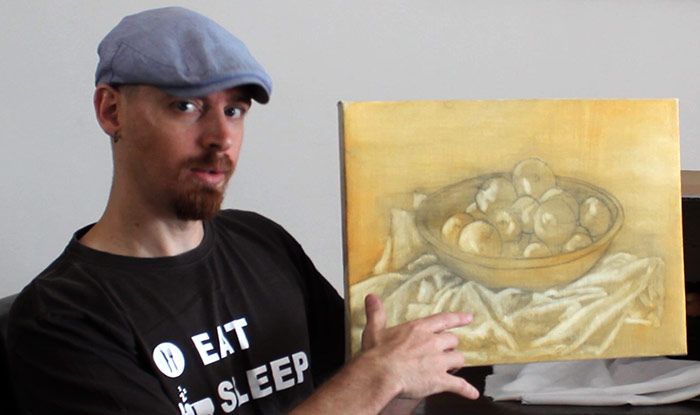
Once I had set up my still life, I did a quick charcoal sketch of the bowl of apples on my canvas, drawing from life.
I didn’t need to make my drawing too detailed. I just had to make sure that I had a good composition, that the bowl was symmetrical, and that my proportions were accurate.
Having completed the charcoal drawing, and checking the drawing in a mirror for any errors, I then toned the canvas with a transparent wash of yellow ochre over the charcoal drawing.
This transparent, first layer of oil paint is also known as the imprimatura, and serves to ‘seal’ in the charcoal drawing, which is still visible beneath the imprimatura.
Allowing the imprimatura to dry over a couple of days, I was then ready to paint my alla prima still life.
Traditionally, alla prima painting is done on a white canvas, without toning the ground.
Painting on a white canvas became popular during the Impressionist period, where artists began to eschew the academic tradition of a layered approach to painting.
They started painting more alla prima, so as to quickly capture a moment in time, or ‘paint the light’.
In my case, I decided that painting alla prima on a white canvas isn’t really a hard and fast rule, and I didn’t notice any painting police in the vicinity, so I gave my canvas a warm yellow ochre tone.
What is the alla prima oil painting method?
Alla prima refers to the technique of finishing the entire painting within one sitting and not waiting for the layers to dry in between. It means literally ‘at the first’ in Italian. So, the paint is applied ‘wet on wet’. And so, it is a particularly dynamic way of painting.

What are the benefits of painting a still life in one sitting?
Painting still life is such an intrinsic part of learning to paint, and attempting to do it alla prima, is a wonderful exercise for any artist. Setting up a bowl of fruit, or a vase of flowers, is quite simple.
A still life painting is a celebration or an acknowledgment of the beauty of ‘everyday things’.
And the best thing is, a still life can be painted completely from life within the comfort of your studio/home. You can control the lighting, the colour harmonies, the textures, and the composition. (And you don’t need to pay a model.)
The technique of painting ‘wet into wet’ is perfect for still life painting.
We like to think of a ‘still life’ as remaining ‘still’, but of course, that is never the case. With regards to natural things especially, flowers quickly wither, and fruit rots.
Hence, the advantage of painting alla prima (or direct painting), is the speedy and ‘painterly’ result the artist is able to achieve through this method.
Alla prima painting also has a certain aesthetic appeal due to painting wet into wet: soft, lost edges and dynamic brushwork or expressiveness.
It is usually less overly-detailed, which thus creates a sense of space, light and vibrancy. And a feeling of capturing a moment in time.
I painted this bowl of apples within a couple of hours.
In another post, I did a similar Still Life Painting of Apples using the layered or indirect painting method.
The layered or indirect technique produces a very beautiful and extremely detailed result which can only be achieved through careful glazing and scumbling techniques. But it takes a lot more time and patience.
As an artist, being able to use both the alla prima and indirect painting methods is important.
Limiting yourself to just one method of painting without delving into others is a terrible self-imposed limit to your painting abilities and understanding of painting.
See also: How artists have kept still life painting alive over thousands of years by My Modern Met.

How to paint apples alla prima with oils
• Set up your still life on a table in front of you. It’s a good idea to shield your still life from extraneous light by partially covering it with a box and using only one light source.
• Once you’re happy with the composition or set up, you can draw the still life with charcoal on the canvas. Or draw directly with an oil colour, like raw umber, and a long filbert or round brush.
• Check your drawing by looking at it in a mirror, or standing back often and view from a distance. This should help to alleviate any drawing mistakes or symmetry/proportion errors.
• You can tone the canvas with a transparent ground over the charcoal drawing and create an imprimatura if you wish. Using a toned ground helps to get rid of the white so that you’re working with a middle tone. Or you can begin painting directly on the white canvas.
• If you do paint a transparent imprimatura, you have the option of using a dry rag to pull out the highlights of the drawing while the imprimatura is still wet. Give the imprimatura a day or two to dry.
• Begin your alla prima still life by painting the dark values first. Avoid using white for the first stages of the painting as this creates a milky or chalky colour mix. For the bowl, a nice dark-stained wood colour can be created with burnt umber and Winsor blue (Phthalocyanine) or ultramarine. Begin painting from the background to the front. Block in the basic shapes.
• For the apples, paint the darker values (shadow areas) first with a thin and semi-transparent tone. A mix of permanent magenta and sap green creates a lovely brown toned wash that can be made either warmer or cooler in tone by adjusting the ratio of magenta to green. Start from the apple furthest to the back, moving to the foreground. And don’t forget about the deepened area around the stem (pedicel) and calyx.
• Once you have sketchily painted the shadow areas with thin, transparent paint, you can begin with the lighter middle tones of the painting. This is basically the body tone or main body colour of the apple outside of the shadow area. For the green apples, use a combination of yellows/greens (cadmium lemon yellow, yellow ochre, sap green or cadmium green), to create a lime green, carefully blending with the borders of the shadow tones to create interesting halftones. For the red apples, start with some interesting oranges and yellows (made with yellow ochre, lemon yellow, cadmium red and burnt umber). Continue to paint fairly thinly.
• Once you’re reasonably confident with ‘blocking in’ the basic shadows and general colours, you can begin painting wet-in-wet, adding the interesting blemishes, striations and colour changes of the apple skins. Be careful not to over blend here. Remember to maintain your tonal values so that the round apples don’t end up looking flat. And be aware of the direction of your brushstrokes so that they continue with the form of the apple. If you need a little white in your colour mixes, use it sparingly. Otherwise, the colour of the apples will become more pastel and less ‘bright’.
• Add any reflections or reflected light that you see, especially where there is a lighter area within the core shadow (mixing a small amount of white with colour), and remember the terminator (where the light area meets the shadow area and the core shadow begins). Make sure your values are working.
• Remember to add the stems (if visible), and the cast shadows formed by the stems.
• Adding a highlight to each apple makes it appear more glossy and bright. Use a bit of white and perhaps a little touch of yellow ochre. Make sure you add the highlight with one confident and controlled stroke so that you don’t blend it into obscurity. Add it and leave it.
• Paint the bowl (adding any details along the rim or along the bowl itself if they exist), and make sure you maintain your values so that the bowl appears round. That means being aware of the light and dark areas and controlling the transition between them. Make sure your brushstrokes follow the contour of the round bowl so that it appears three-dimensional. Be aware of any cast shadows formed by the apples. And add any highlights of light on the bowl (if you see any).
• Depending on how you paint your background, it may change the relative values of the whole painting. It also allows you to soften the furthest edges so that you maintain only a few sharper edges for focal areas. Using a darker background allows the apples to appear brighter, as if they are hit with light. You can go further and create a powerful chiaroscuro effect if you wish to. A lighter background can also work. It just depends on what you want. Consider the colour harmonies of the whole painting when painting the background.
• Paint the table surface (or whatever your still life is resting on). Remember to soften your edges into the background (if you wish to). This also gives you an opportunity to soften the edges around the bowl or still life as well. And remember any cast shadows formed by the still life on the surface of the table.
• Painting drapery also adds a bit of interest and compositional rhythms or patterns to the painting. Begin with lightly scumbling in the shadow areas between the creases and folds of the cloth. Then add the lighter values. Remember to consider the texture of the drapery. Cheese cloth will have a very different feel and look to silk. This is achieved by careful use of brushstrokes and values. If you wish to maintain a strong focal point on the apples themselves, the drapery does not necessarily need to be painted with extreme detail. It’s up to you.
Check out the video above if you haven’t already. This will make the whole process on a lot easier to understand.
In a similar post, check out How to Paint Flowers in Oils. Here I show how to paint a still life of these brilliant red Amaryllis flowers using the direct or alla prima painting method.
Thanks for reading my blog about painting an alla prima still life of apples, and please send me any comments or questions you may have in the comments section below. Which do you prefer? Alla prima, or indirect painting?
Check out some of my figure paintings here.

- What’s the Point of Creating When No One Cares? - 24th August 2025
- Fantasia No.6 in G minor (The Cockatrice) - 3rd May 2025
- Rebirth: Starting Over as an Artist — Part 1 - 17th April 2025
Great. Sometimes I tend to confuse alla prima with expressionist painting because of the type of finish.