
Weird Questions Beginner Oil Painters Ask
- 1 | When does one do underpainting? And is that synonymous with a wash or blocking in?
- 2 | If you do an underpainting, what medium do you prefer to use?
- 3 | How many layers of oil paint can you pile on top of the underpainting?
- 4 | Do you paint an oil painting in subsequent layers by just adding more oil? Or is it more paint?
- 5 | Can I use acrylic under an oil painting?
- 6 | What is the difference between alkyd medium and linseed oil?
- 7 | Which colours do you mix for a typical daytime blue summer sky? Ultramarine blue isn’t quite cutting it for me
- 8 | What type of brush should I use to paint clouds in oils?
- 9 | How do you paint a crashing wave in oils?
- 10 | Should beginner oil painters use the grid method?
- 11 | As a beginner oil painter, should I mix every possible colour on my palette at the start of my painting session?
- 12 | What would you recommend as an alternative to Cobalt Teal oil paint?
- 13 | Is it O.K. to dry my painting outside in the sun in between layers?
Beginner oil painters are sometimes overwhelmed when it comes to learning oil painting. It’s easy to forget that the laissez-faire confidence of a seasoned artist took many years of cultivation.
But we all had that first day when we chose to pick up a brush and start.
Learning the craft of oil painting takes long periods of learning, research, practice, failed paintings, bad drawings, temper tantrums, confusion, self-doubt; and wading through the mire of misinformation taught on the internet and in art schools.
I remember many of my major breakthroughs as a beginner oil painter.
Such as: disregarding the camera and painting from life, atmospheric perspective, making darks without using black, transparent shadows and opaque highlights, colour harmonies, composition techniques, working in layers, and many other random examples which I now consider pretty obvious.
Every painting has taught me something. Some were big A-ha! moments.
But mostly, they were almost subconscious lessons because of my accumulative years of ‘studio-time.’
Many artists talk about getting in your ‘studio time. There is no better teacher than just being in the studio and painting.
People also often talk about the 10 000 hours. It takes 10 000 hours to become good at something. That’s what they say. So it must be true. Lol!
I think it takes longer to become an expert. And a lifetime to become a master. But these are just labels.
Some people may think your art still sucks after 10 000 hours. If you still enjoy painting after 10 000 hours, then who cares?
Anyway, these are some random questions beginner oil painters have asked me:
When does one do underpainting? And is that synonymous with a wash or blocking in?
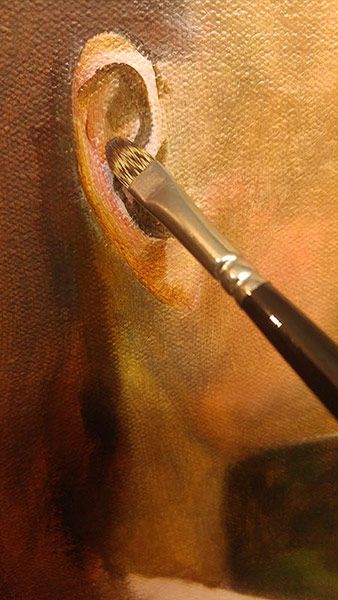
Underpainting can be a wash or block-in, but usually, with oil painting, it is a monochromatic grisaille or brunaille underpainting over your charcoal underdrawing. You can make your underpainting as detailed as you want.
Washes are usually for watercolour. But that being said, it could also be a transparent imprimatura in oils that tones your canvas with a colour over your drawing.
Allow drying in between the different stages.

If you are painting in more of an Impressionist style, you can do a block-in in basic muted colours.
Let’s say you’re doing a vase of flowers or a scene with trees and mountains etc. You can just do a hazy kind of block-in by roughly indicating the sky, trees, horizon, or the vase and colours of the flowers. Then add your details as you continue.
This technique can be done wet-on-wet, or in stages, allowing drying in between. For further reading, see Grisaille and Its Expressive Power by Widewalls.
If you do an underpainting, what medium do you prefer to use?
If you are struggling with solvents, then don’t use them. You can try Winsor and Newton Liquin. Or just a little bit of good quality linseed oil.
The linseed oil we get nowadays in art stores is rubbish.
In ye olde days, artists made their own linseed oil, refined through salt and sand over many months. This homemade linseed oil recipe was passed down from master to apprentice, generation after generation.
It retains all its quick-drying properties and film strength.
Linseed oil from the art shop is industrially refined and it dries slowly. Basically, because all the fatty lipids and properties that encourage natural oxidation (drying) have been chemically removed.
So you could actually paint completely without solvents and just use handmade linseed oil. And you won’t have any issues.
But be careful with using too much oil in your underpainting or imprimatura stages. You will have cracking and delamination issues if you paint a ‘lean’ layer of paint on top of an oilier ‘fatter’ layer beneath it.
Hence the commonly known rule in oil painting of ‘fat over lean’.
But in the meantime, don’t worry too much. You don’t need solvents.
That just became fashionable in the 19th Century when artists started using dammar, balsam and other resins and varnishes, and needed turpentine to dilute it.
Resins are bad for film strength. So disregard them.
Some artists like to do washes or tone their canvas with paint diluted with turpentine, in the underpainting stages.
But using too much turpentine or mineral spirits can cause the pigment to become underbound. The binder (oils/waxes) in the paint becomes so diluted, that the pigment no longer adheres to the support. It can create flaking, crackling or powdering off.
And don’t get me started on odourless mineral spirits (OMS).
Just because it’s odourless, doesn’t mean it doesn’t contain harmful vapours. These poisonous fumes are breathed in by the unwitting artist all the livelong day.
And OMS is really an aggressive solvent, causing chalkiness and major underbound issues with the paint film. It also creates weakened subsequent film layers above the underpainting.
Just use the paint straight from the tube and brush it thinly.
Earth colours, like umbers, siennas and ochres, dry fast and have good film properties. Although, they can be a little brittle if painted too thickly, and tend to absorb a lot of oil. So use them for underpainting.
Remember fat over lean.
Synthetic compounds are better for the upper layers and for glazes. Pigments like quinacridone magenta, arylamide yellow, phthalocyanine (phthalo blue and phthalo green), cerulean, etc.
They have weak film strengths, tend not to absorb oil as much as organic pigments (though not always), and are slow drying. But generally, they have high tinting strength and are more transparent.
Learn the different characteristics of different pigments. Read the labels, research online. Is it quick-drying, or slow? An organic or inorganic compound? High or weak tinting strength? Stable film properties?
You can actually get away with not using mediums, especially for underpainting.
You can thin the paint mechanically by using stiff hog hair bristle brushes to spread the paint, or a dry rag to wipe excess paint away.
Use good quality paint straight from the tube with its own natural oil. And paint thinly for the underpainting. Don’t squeeze a tube full of paint all over your canvas in the underpainting stages.

How many layers of oil paint can you pile on top of the underpainting?
As many as necessary. Remember the fat over lean rule. Don’t use too much medium, solvent, nor oil. Ensure plenty of drying time in between the layers.
Sometimes you may want just one alla prima layer. Sometimes 7 or 8 layers — which include many layers of glazes and scumbles.
It depends.
Just think about what you’re doing, and plan. Write down your plan of action for the painting in your journal so that you don’t lose track when you come back to the painting in a few days time.
Make sure every paint layer you add is more flexible than the last. This may mean adding slightly more oil to each layer or using more transparent pigments that have a lower oil absorption in the upper layers than in the lower.
Do you paint an oil painting in subsequent layers by just adding more oil? Or is it more paint?
It depends. As long as you adhere to the fat over lean rule, you can add either thicker layers of paint with more impasto. Or thin oily layers for glazes. ‘Fat’ in this context may mean thicker layers of paint or adding more oil.
You can simplify the fat over lean rule if it confuses you, and just remember flexible over less flexible. Whatever layer you put on top must be more flexible than the layer beneath.
Shadows are usually thin glazes with more oil, highlights are more paint/impasto.
Rembrandt was famous for his very thick impasto layers of paint, over which he added transparent glazes.
There is a point where adding too much oil creates more problems than necessary. Adding too much oil may create wrinkling of the paint film, problems with drying, or beading.
Beading is where the next layer of paint has no adhesion to the canvas, due to the glossiness or lack of tooth of the previous paint film, and it beads on the surface. Just as water beads off the oily feathers of a duck’s back.
Can I use acrylic under an oil painting?
Beginner oil painters tend to think acrylic is easier somehow. I don’t think it is.
Despite what everyone tells you, don’t use acrylic under oil! Unless you’re just screwing around and you don’t care about longevity.
Oil is more rigid, acrylic more flexible. And to make matters worse, a canvas is like painting on a trampoline. You’ll eventually get cracking, cupping and delamination if you use oil on top of an acrylic ground.
Oil does not chemically bond with acrylic. And therefore never adheres properly.
This is why it’s important to avoid acrylic-primed canvases if you’re painting with oils.
Commercial acrylic canvases from the art store are rubbish anyway. Oil-primed canvas is a world apart.
To make matters worse, commercial acrylic-primed canvases use cheap materials and pigments.
Zinc oxide is a commonly used white pigment in artist and house paints due to its low cost. But it causes a world of issues with the paint film. It is an extremely brittle pigment and is prone to cracking and delamination.
The best option is to use a rigid support such as a wooden panel, or a canvas stretched over board, to mitigate the ‘bounce’ and flexibility of painting on canvas.
And to use an oil-primed ground without any zinc oxide. See also: Painting for posterity with modern oil paints by George O’Hanlon.
But for beginner oil painters, don’t worry too much. Use cheap canvases to practice on. Or just prime paper for oil sketches.
I would say that for most artists, their first hundred paintings or so are not very good. So don’t worry too much about materials at this stage and just focus on getting your ‘studio time’ in.
You can use acrylic as an imprimatura, but your painting probably won’t last. 50 years later though, it probably won’t matter much to you anyway.

What is the difference between alkyd medium and linseed oil?
An alkyd medium, such as Winsor & Newton Liquin, is easy to use for beginner oil painters and creates a flexible, quick-drying film.
As long as you don’t mix too much of it in your paints, and apply a small amount to each layer, you don’t need to be too concerned with the fat over lean rule than you would normally.
This is because it creates a tough but flexible paint film. It also makes glazing in oil paints much easier for students.
Both linseed oil and alkyd mediums can produce defects in the paint film through being mishandled or misunderstood. So the fault is not always with the medium, but the user.
There is always, of course, a difference in quality with different linseed oils — by the way they are made and their refining process. The same goes for different brands of alkyd mediums.
But I hate the smell and the messiness of alkyd mediums. It quickly coagulates like snot in the bottle. And I find the Liquin creates quite a glossy paint film, so the next layer of paint is prone to beading on the surface.
Liquin also contains solvent and some say is prone to yellowing. Although I can’t say I’ve necessary found it yellows more than linseed oil.
Alkyds are typically made from slow-drying oils like soy, safflower, palm, castor and coconut. Therefore they contain added driers like cobalt, zirconium or other metals. And driers cause embrittlement and yellowing over time.
I have found that I hate the gooey soft paint film Liquin creates, which never feels quite cured.
And it’s difficult to judge the glazing, as it often dries far less bright and lighter than when wet. ‘Sinking in‘ seems to be a problem. Especially for the darks. For this reason, I prefer glazing with linseed oil.
I don’t like quick-drying mediums that speed up the drying time of oil paint. Because sometimes I prefer to keep the paint ‘open’ or workable for longer. And I’m never impatient for my paintings to dry. I usually work on several at once in any case.
Now I just use paint and linseed oil. I don’t need anything else. The paint is the main star.
And hand-refined linseed oil has all the properties you need — quick-drying, non-yellowing, non-darkening, tough film strength, no added driers, and solvent-free! — where art store-bought linseed oil fails.
You actually don’t need to use mediums if you’re experienced and if you use good quality paint.
Rubbish commercial paint means rubbish results. Handmade artist quality paint without extra driers, waxes and fillers mean good results.
And homemade washed linseed oil has better film strength, less yellowing and faster drying times than commercial alkaline-refine linseed oil.
But for beginner oil painters, just use whatever. Don’t stress. It’s good to explore what works for you.
Whatever medium you use, make sure that you don’t use too much in your mix. Use as little as possible. Keep it under 20% in ratio to the amount of paint you use.
And don’t use combinations of mediums in different paint layers. For example, don’t use Liquin for one layer, then linseed oil, then walnut oil. Keep it consistent.

Alkyd Medium vs Linseed Oil
| Alkyd Medium | Linseed Oil | |
| Drying Time | fast | slower (depending on refining process) |
| Ease of Use | very easy | easy |
| Working Properties | speeds up drying, improves fluidity, reduces brushstrokes, makes paint film sticky | allows long open time, improves fluidity, reduces brushstrokes |
| Film Properties | tough and flexible, though may harden and become brittle over time | strong film strength, though loses flexibility through oxidation, improves gloss |
| Rheology | gel | oil |
| Contains Solvent | yes | no |
| Smell | unpleasant | pleasant natural oil smell |
| Uses | glazing, blending, extending paint, fine detail and cleaning lines, wiping on a couche, speeding up drying. Never use as final varnish. | glazing, blending, extending paint, fine detail and cleaning lines, wiping on a couche. Never use as final varnish. |
| Problems | depending on manufacturing quality and amount used, can cause yellowing over time, blooming, wrinkling, sinking in, makes paint film sticky and prone to beeding, embrittlement | depending on refining process and amount used, can cause yellowing and embrittlement over time, blooming, wrinkling, beading, oxidation causes deterioration of support unless a size is used. |
Which colours do you mix for a typical daytime blue summer sky? Ultramarine blue isn’t quite cutting it for me
Usually, cerulean and white. You can tone your canvas with a warm colour like yellow ochre or burnt sienna and experiment with the refraction properties of colours in layers.
Yellows, oranges, pinks, and even reds sometimes, work well for toning the ground, à la Claude Lorrain, Jean-Baptiste-Camille Corot, John Constable, and many others.
Ultramarine is great for painting stormy clouds when using a burnt umber underpainting. Lovely purples and violets result because of the layering.
Try different coloured underpainting layers and see how it influences the next colour layer on top.
By toning the canvas with a warm ground and allowing that ground to show through, the artist is able to balance the colour harmonies of the painting, and carefully control the tonal range. This is called tonalism.
Although tonalism generally refers more to painting atmospheric, moody or greyed scenes, rather than a bright blue summer sky, you can still use these concepts to avoid creating a flat-looking painting.
For further reading on tonalism, see What Is Tonalism? by David Adams Cleveland

What type of brush should I use to paint clouds in oils?
It depends on the style of painting you like to do. Are you a loose, expressive painter that uses lots of paint and impasto? Then use a large, stiff brush.
Or do you paint very tight, with fine detail and lots of thin glazes? You may end up doing most of the work with soft brushes.
Firstly, depending on the size of your canvas, use the largest brush you’re comfortable with. You can even use a house painting brush to get the general layout or gestural movement of the clouds.
If you prefer, compose the main elements of the skyscape by drawing or painting a quick separate study.
Then, with an idea in mind for the composition and simple values (the dark and light areas), begin to block-in the main elements.
Remember that clouds and waves take up space and have mass and perspective. Think about it in 3D. Which side will be lit? Which side is in shadow? What is in front or behind it?
Painting pure white fluffy clouds without any tonal range or variation in hue is for pre-school children.
Remember that thick clouds cast darker shadows. If they are close enough, they may cast shadows on each other.
Usually, they reflect whatever colour the land/sea is beneath them. But not always. That’s why it’s important to paint from observation. And light and weather can change within seconds.
And remember atmospheric perspective. Clouds further away and closer to the horizon will appear lighter and have less tonal range than clouds overhead.
But as to the question about brushes. After the block-in, I use hog hair bristle brushes mostly for the heavy-duty work. I like filberts mostly. But you can also use round.
For clouds, it’s nice to use old bristle brushes that you don’t mind getting a bit messed up.
Remember, clouds usually have soft edges. So scumbling with an old brush is a great technique.
You can also use a large mop brush, like ox or squirrel hair, to soften the atmosphere and edges. Some people like to use fan brushes. But I never found them that useful for my style.
Then, as you get to the details, you can gradually go with a smaller brush size.
If you want to add sunlit edges or paint highlighted details, you can use a synthetic or natural soft hairbrush. Again, it depends on the size of the painting. I may use a number 4 long filbert to number 0 soft round.
For glazing shadows and darkening the atmosphere, I glaze with soft natural hair brushes.

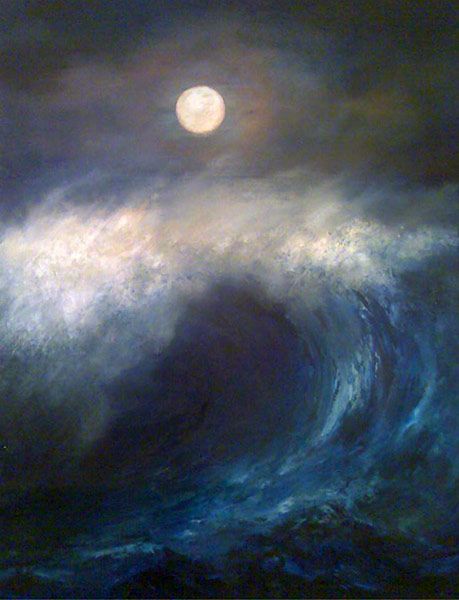
How do you paint a crashing wave in oils?
You can begin with drawing or painting a quick study. This will help you visualise the composition of the scene, and the dynamics/movement, structure, value range and even colours you’ll be using for the main painting.
Understanding the direction of your brushstrokes is also very important.
There are many ways to paint water. And every artist has their own style and preferences.
You can basically paint it alla prima, or in layers.
I usually start with a grisaille, using only black and white or raw umber and white, and paint the whole scene with this monochromatic palette.
You can use a toned ground if you prefer, or a white canvas. It’s up to you. I sometimes tone the ground with yellow ochre.
Or you can simply block-in the general layout of the wave with muted colours. Be sure to indicate the light and dark areas of the wave. As well as the directional movement of the water.
Remember, the base of the wave is usually a bit darker than the middle. And if the wave has foam, the top part is generally the lightest.
Whether you use a grisaille or general block-in, be aware of the values (tonal range). And paint the values slightly lighter than normal. This is to make provision for the added transparent glazes to come.
Allow it to dry for a few days, then you can begin to build up transparent glazes. Transparent pigments such as sap green, viridian, phthalo green, cerulean, ultramarine, Prussian blue, raw umber and raw sienna, work well for seascapes.
If you are adding breaking crests and foam, don’t just use pure white. Mix in a little yellow ochre or similar. And you can apply thick impasto paint if you wish.
Sometimes there’ll be a surf of trailing white foam crisscrossing the water at the base of the waves.
Remember, water is also reflective of the sky above. And, depending on how clear or deep, the sand beneath.
And remember atmospheric perspective — the waves further back towards the horizon will appear paler and have less tonal range.
Should beginner oil painters use the grid method?
Artists who use grids either can’t draw or are trying to copy a photo for some reason. (Don’t copy photos. Draw from life. At least for the first 2 years.)
Draw freehand.
The only time you need a grid is if you’ve already designed a really detailed drawing yourself and want to transpose it to the canvas. Even then, you should be able to just draw it on the canvas by eye.
Don’t go down that road. Be a real artist, not a Pinterest/Instagram poser.
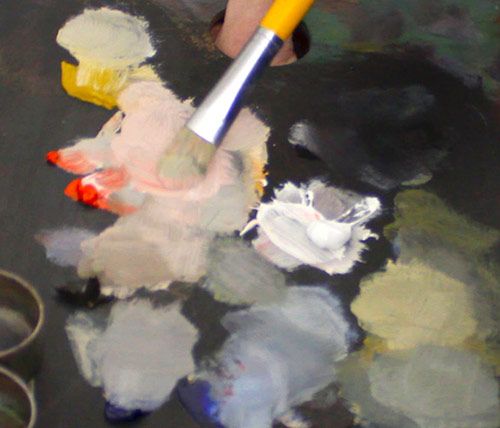
As a beginner oil painter, should I mix every possible colour on my palette at the start of my painting session?
You can if you want, but it’ll be a bit of a waste of paint. You’ll learn quickly though. Some artists like to use a lot of paint. They find it freeing to squeeze lots of paint out onto the palette. That’s part of their process.
I just mix what I know I’ll need. And I don’t use much paint.
That’s just my style.
Experiment with different colour mixes and discover what works for you. It takes time to learn one’s preferences. Try to use few colours in the beginning. Until you get more used to painting.
Beginner oil painters can simply use a limited palette, or 2 to 3 colours plus white, and go from there.
If you have the patience, make your own colour charts, mixing 5% at a time. You’ll have hundreds of colours.
For me, it’s easier to just paint a grisaille, focusing on values and forms, then build up colour afterwards.
If you want to paint alla prima, then have fun, and work out some colours on your palette first. Don’t stress too much. They will get messed up on your palette anyway.
Think about mixing complimentaries for greys — think about pure or muted chroma. If you’re mixing a lot of colours on your palette, you’ll end up naturally with some interesting looking greys.
Art teachers are always warning beginner oil painters against muddy colours. Don’t worry about that. Learn to control the chroma of your hues. And use ‘muddy colours’ when appropriate.
Sometimes I just mix my colours on the canvas while I’m painting. It depends.
Oil paints take a while to dry, so you have plenty of time to blend and create different colours.
Just know when to stop messing with it. Because you can eventually mix it to a muddy turd.
So use your rag to clean your brush constantly. You don’t need to keep washing it in turps as some people do. I just use my dry rag. Or swish the brush in some linseed/walnut oil while painting.
What would you recommend as an alternative to Cobalt Teal oil paint?
You can get a similar colour with Prussian blue, phtalo green and a bit of titanium white.
Or try mixing cerulean, yellow and white.
You’ll figure out the ratios. Don’t get hung up. Different paint brands have different cobalt teal hues. It’s basically cobalt oxide and titanium Oxide Co2TiO4, so you can get many variations.
Is it O.K. to dry my painting outside in the sun in between layers?
No. Never.
Conclusion
Thanks for reading and I hope you picked up some new info here. If you have any burning questions about painting or drawing, please feel free to comment below, or email me.
Check out more Art Mullings and Makings in the Studio

- What’s the Point of Creating When No One Cares? - 24th August 2025
- Fantasia No.6 in G minor (The Cockatrice) - 3rd May 2025
- Rebirth: Starting Over as an Artist — Part 1 - 17th April 2025