
What is Gesture Drawing?
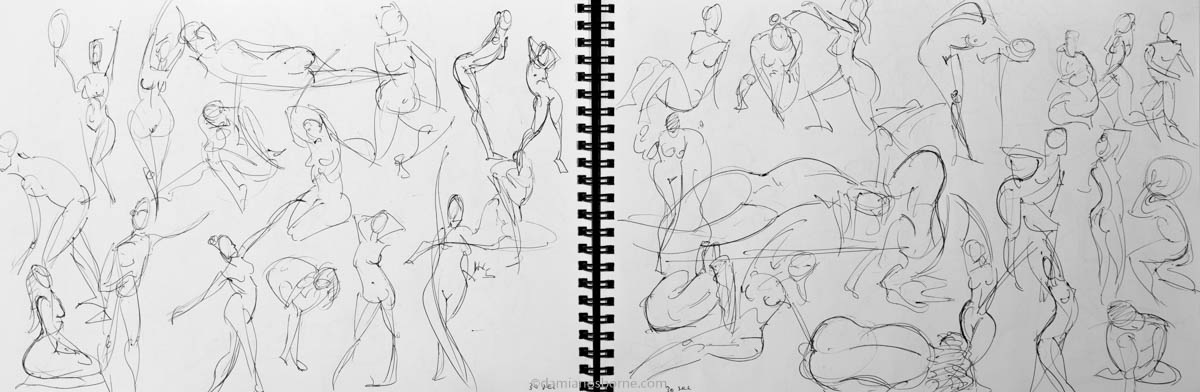
Gesture drawing is quick, free flowing, simplified sketching of the human form. The drawing sessions are usually timed from 30 seconds to 2 minutes. They are normally done from a live model, hence the term ‘life drawings’. Usually, the model is in the nude, as this allows the artist to really observe and study the anatomy of the human form.
Gesture drawing practice
Gesture drawing practice is the basis for artists learning to draw the human figure. It is the practice of drawing from life, not photos.
You can’t expect to be a great jazz or classical musician if you don’t know your scales. Likewise, gesture drawing practice is like practicing scales. Your pen or brush is your instrument.
In my life drawing group every week, we begin the session with a few 2 minute and then some 5 minute gesture drawings.

It’s an advantage being able to draw from a live model every week. And your general drawing skills will definitely improve. Although, you need to be very patient with yourself.
That’s why it’s important to keep all your drawings and sketchbooks. Because sometimes you only really see the improvement while looking back at your old work from the year before.
Sometimes though, you’ll have bad drawing days no matter what. But that’s ok. All artists have them. So if you feel frustrated about your drawings, check out Those Bad Drawing Days.


If you don’t have access to a live figure drawing model, there is a lot of online figure drawing reference sites where you can practice daily quick gesture drawing studies.
Check out:
Some of the life drawing sites allow you to set the timing of the figure reference poses.
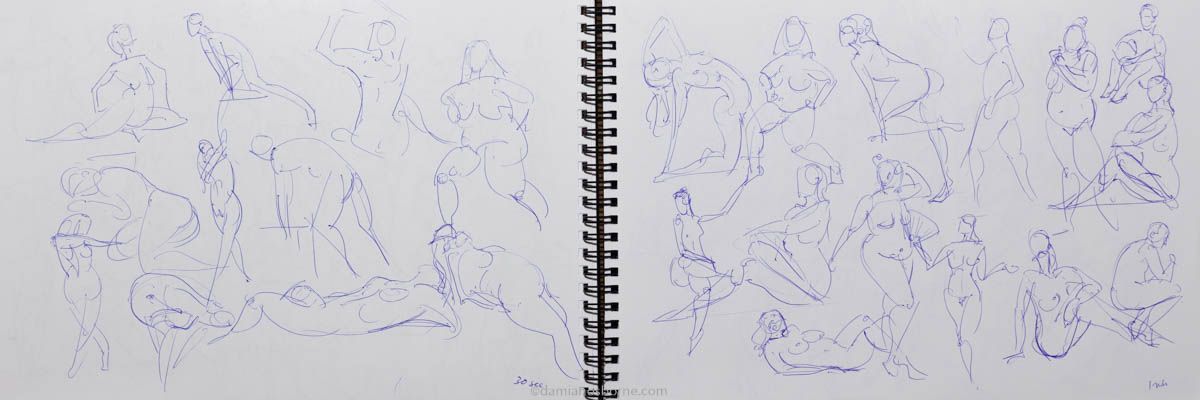
If you struggle to get the gesture down in 30 seconds, try to slow it down to 2 or 3 minutes. If you time it longer than this, you may be tempted to draw all the details and thus create a rather stiff drawing. And that’s not what anyone wants.

Why is gesture drawing important?
Gesture drawing is important for artists because it gets you used to analyzing what’s in front of you quickly. This is an important skill for any artist, whether you paint/draw the human figure or not.
The point is not to try and make ‘pretty’ drawings. There’s no time for that!
You’ll be amazed at how much information it’s possible to get down on paper in two minutes or even 30 seconds.
This really helps to ‘get your eye in’. It loosens up your drawing hand. And it forces the artist to gather information quickly, to draw faster and more intuitively. It really tests the artist’s anatomy knowledge and drawing skills.
It’s easier to see where you are lacking as an artist when the time pressure is on. It also helps to prevent overworking a drawing to death.
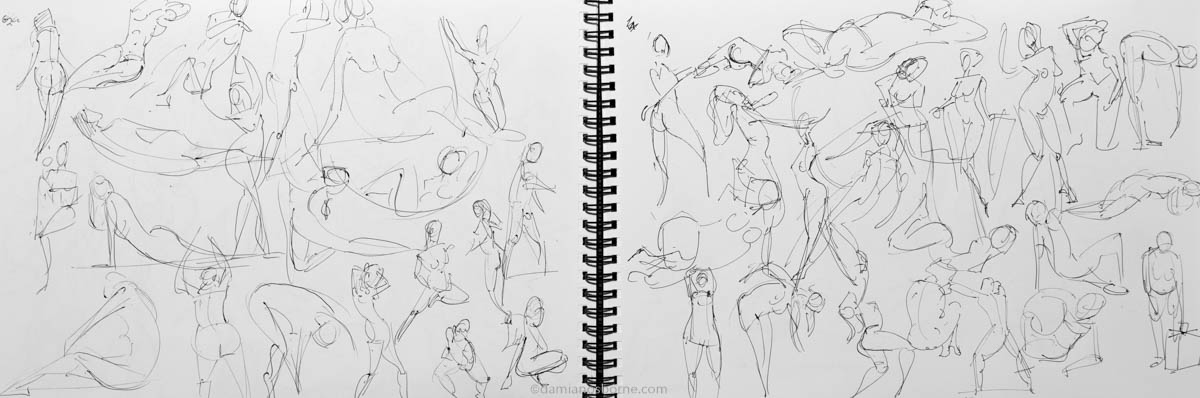
But the point of gesture drawing is getting yourself used to seeing the figure in terms of its rhythms and movement i.e. its ‘gestures’, rather than focusing on anatomical ‘correctness’.
Although, both types of figure drawing study, the quick gesture sketches, and the careful anatomical drawings are important practices and benefit each other.


Gesture drawing beyond just figure drawing
Like composition, gesture is everything in drawing. It’s what brings an artwork alive. It adds dynamism, flow, rhythm and feeling. Emotions are expressed through movement, whether through subdued or dramatic movement. Through balance, or off-balance etc.
Gesture is in the sweeping road or river flowing through a landscape painting. It’s in the ridges of mountains, the boughs of trees, in clouds, in the horizon. It’s in a still life. In the folds of drapery, the position of the objects relative to each other.
Gesture is especially evident in nature. Think of wind-swept grass, or waves crashing, birds flying or a cat stalking.


But it is important in all things, whether animate or inanimate. A pile of stacked boxes has an overall gesture to the composition. Even buildings in an urban sketch can have gesture.
You can really push and stretch your compositions and the overall energy in your drawings or paintings by thinking about gesture.
Graffiti and comic artists are pro at this. Think of a how a cartoon artist would add a feeling of pent-up energy and power to a muscle car, with squealing, swollen wheels and flames bursting out the sides.
You get the picture.
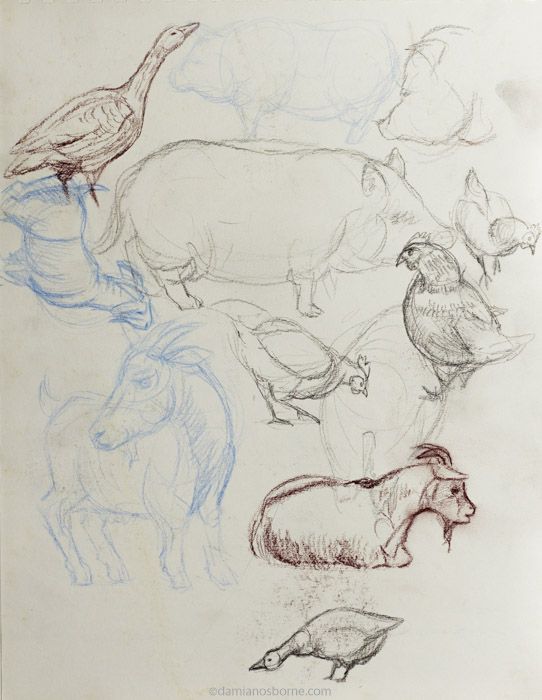
Animal gesture sketches
Practicing quick gesture poses can also improve your animal drawings. SketchDaily and Line of Action offer timed animal poses as well.
Better yet, if you have a pet, or visit a farm or zoo, you’ll have plenty material to work from life with. Drawing animals while they’re moving all the time can be highly frustrating.
But it’ll sure teach you to draw fast. You’ll start to understand animal anatomy better through observation. And your overall drawing skills will definitely improve.


Learn to let go and loosen up a little
Nothing is more frustrating as an artist than getting stuck on a stiff, wonky drawing that looks terrible. And reworking and reworking it to death. How often have you wanted to throw your pencil across the room and scream?
Well, you gotta loosen up a little.
Like I said, sometimes there’s no point to trying to make ‘pretty’ drawings. Yes, there are those times when you learn a lot from trying to fix a drawing hardened by rigor mortis.
But generally, it’s better to move on and try again. Usually the next few tries of the same drawing produces a much more fluid outcome.

Think of gesture drawings as quick drawing notes or shorthand sketches. They don’t have to look special.
You don’t have to show anybody.
So don’t worry about making mistakes. Don’t worry about making them special. They are simply exercises to get you loose and in the workflow.
Because gesture drawings are usually loose and sketchy, they can be helpful thumbnail studies for planning compositions, whether you’re a comic artist, a sculpturer or a painter.
Don’t just copy
Another great thing about gesture drawings is that you can really just focus on making artistically expressive drawings.
Anyone who looks at art on Google Images knows there are millions of stiff amateurish drawings on the internet. Well, we all had to start somewhere. As Ralph Waldo Emerson said:
Every artist was first an amateur”
But drawing is more than just trying to make something ‘look real’. It doesn’t help trying to be a human photocopy machine. That doesn’t really teach you anything. Nor does it allow you to think about what you’re drawing, to understand it, or express yourself.
It’s not original. It doesn’t come from you.
That’s why drawing from a live model is so beneficial. Firstly, because you can’t just copy as you would a 2D image from a photograph or a screen.
You have only a few seconds to translate a 3D human figure standing before you, into an expressive line drawing on a 2D surface.
And besides, you don’t have time to copy. There’s no time to get all the nuanced details. The point of gesture drawing is to capture the movement and rhythm of the figure. It’s an art to be able to simplify shapes and make them dance.
It’s important to be able to translate what you see into a recognizable figure performing a recognizable action with just a few lines.
Try to exaggerate the movement of the pose as much as you can. Forget about measurements.
This is the opposite mindset to copying.
It is translating what you see into your own expression. It’s too easy for a figure drawing to become stiff. So push the pose as far it can believably go.
If you don’t have access to a live model you can still benefit from the online sources. Just make sure you don’t fall into the trap of merely trying to copy the photo.

Useful advice for gesture drawing
There’s a lot of useful advice out there in the many blogs, books or videos available on figure drawing.
And I can’t count how many times I’ve had people come up to me in life drawing class or elsewhere, look at my drawings and feel the need to give me their unsolicited wisdom.
So be careful what you listen to. And don’t be intimidated if you think your drawings are crap. The real art of being an artist is learning to be patient with yourself, try things, and to not quit.
I would say that most of what I learnt about gesture drawing, was through actually physically being there and drawing.
While you’re drawing, you’ll have a lot of thoughts, realisations and ideas running through your head. It’s like learning any skill. The more you do it, the more the neurons in your brain will start making connections.
So you can listen to all the advice out there that you want. It’ll never make you a great artist. You have to practice.
Learning basic anatomy is something you should study though. It’ll be an incredible benefit, even for your simple gesture drawings.
Some things about drawing are so subtle or personal, they can’t actually be taught.
As you draw, you start to form your own habits. Just make sure they are good habits. But don’t be too rigid not to shake things up once in a while.
For example, I often hear the advice that you should always start with the head. Well, I usually start with the head. But sometimes I don’t. In fact, a lot of the time I end up drawing the head last.
That’s just the way it goes. Who gives a sh*t about rules? These are just quick sketches for Heaven’s sake.

Some more tips for gesture drawing
These are just tips. Not rules set in plaster above the doorway of the hallowed academy. Some tips that have personally helped me are the following:
• Don’t get stressed about the time limit. Draw what you can, then stop. Let it go.
• Don’t rush. Kinda goes with point one. But you don’t need to draw slow.
• In fact, vary the speed of your drawings. This is a very interesting exercise to play around with. See how your styles change with different speeds. Like your handwriting does when you write fast or slow.
• Don’t worry about what the sketches look like. In fact, rather don’t show anyone. Don’t let your ego get involved, whether you think they’re great or terrible. That way you won’t worry about what other people think. Focus completely on the exercise.
• Focus is an interesting thing. Learn to hyper-focus while remaining completely relaxed. If you have issues with being able to focus generally, then gesture drawing will probably be a really good exercise for you to practice. Get rid of distractions, or tune them out.
• Don’t focus on one body part (unless it’s your intention). Gesture sketches are meant to show the gesture of the pose. Therefore they are usually gesture lines of the whole body. Spending too long on one part means you’ll run out of time to get the whole pose.
• Don’t worry so much about facial features, drawing fingers or shading, unless you want to. If you focus on one thing, you’ll have to sacrifice another due to time constraints. Eventually though, through practice, you’ll be able to get a lot more information down more quickly and accurately.
• No time for overworking. Move on.
• Focus on one area of interest if you are trying to understand it. Don’t worry about drawing a complete pose. Though studies are usually done in the slightly longer poses. (See, these are just tips. You can do what you want.)

• Keep it loose and keep it light. If you hold your pencil or charcoal too rigidly, your drawing will look rigid. I like to draw overhand so that I’m drawing with my whole arm, not just my wrist. Draw lightly at first to find yourself, then commit. If you draw too dark from the get-go, you can’t bring it back.
• Learn to change the position of your pencil, your page or your body posture quickly and fluidly. Don’t get stuck in one position. Loosen up your body. Drawing is an action. And like in sport, it takes time to get used to the movements.
• Drawing is very physical and tactile. Practice controlled drawing movements. Use scrap pages to practice different mark makings, patterns, rhythms, line densities and directions. Some movements may feel odd at first, but eventually they will start to feel more comfortable.
• Don’t be timid. Exaggerate the movements. Feel the movement of the body. Push it as far as possible. Exaggerate the taper of the limbs.
• Forget about measuring. Draw from intuition. Longest forms and lines first. Use the joints as structural end points. Find the longest line or rhythm and simplify.
• Think direction. Gesture is not the same as contour.

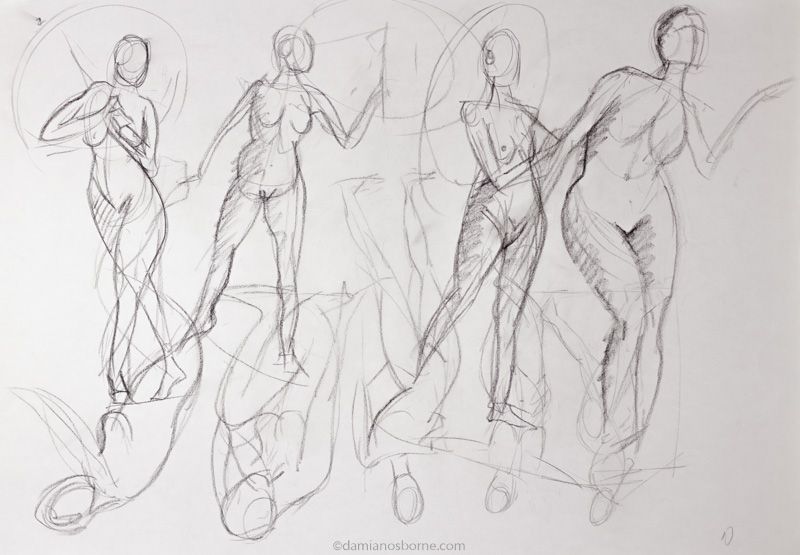
• Generally speaking, with gesture poses, I use sweeping curvy lines to describe the action of the whole body from head to feet or bottom. This is called the line of action. I use C shapes and S shapes mostly. They are very expressive lines. But sometimes you need to use sharper or more linear lines. Such as a quick change of direction or a pivot point or protrusion of bone, like elbows, knees or the iliac crests of the hips.
• Determining the overall direction or line of action of the body is usually the first step. I feel and quickly sketch the longest rhythm line. And I consider the overall size and direction of the pose on the paper. How much space do you want to take up on the page? What are the outer limits? You can draw as big or small as possible. Try mixing up the size of your drawings.
• Construction lines are useful. But draw lightly. There’s no need to keep drawing the same lines over and over and making a mess. Try to be economical and confident in your mark making.
• Don’t be scared of using ‘lost and found’ lines. Vary the line weight.
• Simplify shapes quickly by using sweeping strokes. Use the ‘bean’ shape to describe the basic shape of the torso (usually the main ‘bulk’ of the body). And think of centre lines like the spine or linea alba (front). How do they indicate space and form?
• I use very basic abbreviated shapes to indicate the head, curve of the neck and spine, rib cage and the box of the pelvis.
• Drawing imaginary centre lines through the limbs or using the spine, helps to determine the overall direction or action of the limbs/pose. Think of drawing a very fluid stick figure.
• You can build a 3D framework around the pose by using imaginary lines to join important landmark points like the top of the skull, jaw line, spine, pit of the neck, clavicles, acromion processes (top of shoulders), scapula, sternum, xypoid process, nipples, rib cage, navel, iliac girdle, pubis, head of the femur, knees, elbows, wrist bones, and ankles etc.
• Think about balance all the time. Where is the ground plane? How is the body leaning? How far can you push it? Where is the counter balance?
• Draw horizontal lines to indicate slant of the shoulders and pelvic girdle. The angles of the shoulders or hips in a leaning upright figure are usually opposite each other. So for example, if the shoulders are at a 30° angle, then the hips will usually be a minus 30° angle. The line of the clavicles and the ridge of the pelvic girdle and the heads of the femur bones are easily recognisable landmarks.
• Think about the twists and pinches of the body. Use long curvy lines to describe the ‘long side’ or direction the body is moving toward. The twists and pinches are like creases where the body changes angle sharply, such as the inside pinch between the ribs and hip of a twisting torso.

• Think about the form in 3D. Use cross-contour lines to show the roundness of limbs, or the torso etc.
• Think of spacial aspects. Is there any foreshortening? What part of the body is closer to you, and what is further away? Don’t draw a flat-looking picture. Again, think of the roundness of the limbs.
• Draw what you see. But understand how to use basic 3 dimensional construction with blocks, cylinders, cones and spheres. Usually I don’t have time to draw a full and neat construction, so I just indicate it intuitively. Like using a spiral pattern to indicate an arm or thigh pointing towards or away from me.
• You’ll learn your own method of abbreviation once you can build the human figure out of simple 3 dimensional shapes and you understand basic anatomy.
• What do you like most about the particular pose? What are the most important elements to the pose? And what about it can you really exaggerate or push dynamically?
• And lastly, stop being fussy with the choice of model or the pose you’ve been given. You can draw the same model or even the same pose over and over and still keep learning something new.
Mediums for drawing
Newsprint
Newsprint is great for gesture drawing because, well it’s super cheap.
But it also has a nice soft texture, and the charcoal shows up nicely on it. It’s so easy to draw on.
And it frees you up to not feel so precious of your life drawings. You can scribble to your heart’s content.
It is unfortunately not archival or acid free, so your pages will probably yellow in a few years.
Cartridge paper
Cartridge paper is also plentiful and cheap. It gets its name from its use in making firearm cartridges for musket rifles.
The range of different weights makes a big difference to how the paper reacts. The lighter the grammage, the more it wrinkles and the less abuse it can take.
For gesture drawings, I use cheap 90g cartridge as I don’t care much for it’s longevity.
Cartridge paper will also yellow anyway, as only the expensive papers are archival.
And just because a paper is labelled acid-free, doesn’t mean it won’t yellow over time. It means the acid has been temporarily neutralised by the process of bleaching the paper and buffered by adding alkaline.
Most papers are made from wood pulp, thus containing lignin. Lignin produces acid as it breaks down.
Real acid free papers are made from rag paper which comes from cotton. And the higher the cotton content, the more expensive the paper. Totally unnecessary for gesture studies.
Cartridge paper is great for pen and pencil because it’s smooth. But it doesn’t really have enough texture to hold charcoal.
Thick cartridge paper (over 120g) can be used for quick ink and brush gesture sketches.
Watercolour paper would be an unnecessary expense in this case.
Charcoal, pastel or conté pencils
I usually use charcoal or conté pencils on newsprint for drawing gesture poses.
Charcoal, pastel or conté pencils are encased in wood like a traditional graphite pencil.
I sharpen the pencils with a very sharp craft knife in order to expose about half an inch of the charcoal or conté above the wood. And to get more of a gradual angle for overhand drawing.
Using a pencil sharpener never works. The charcoal just breaks and the angle of the ‘lead’ is too acute.
My favourite brands of charcoal and conté pencils are Conté à Paris, Koh-i-noor, Rembrandt Lyra and Faber-Castell. Although I’ll use any cheap brand or whatever I have at hand.
You get different grades of hardness with charcoals, though the range isn’t as incremental as with graphite pencils. Basically you get soft, medium, hard.
I prefer using the hard because after furiously scribbling a whole lot of gesture poses, it retains its point for much longer. The soft charcoal is nice and really dark, but better for deepening lines and shadows in the long poses. It doesn’t stay sharp for very long.
I use a bit of Prestik instead of a putty rubber to rub out in life drawing class sometimes. Because it does pretty much the same thing at a fraction of the cost.
But with gesture drawing, there’s no time to rub out, nor do I feel you should. And mistakes are just part of the drawing.
Charcoal can also be used with a brush dipped in water as a wet medium. But that technique is more for longer poses.
Once you’ve finished your dry drawing, you can go over areas with water. This creates a beautiful watercolour-like effect, producing tonal washes.
You’ll need better quality paper to be able to handle the water though.

Vine, willow, compressed charcoal, chalk and soft pastels
Vine and willow charcoal, and compressed charcoals are also great, though you’ll probably feel the need to get large sheets of paper.
It lends itself to a more expressive application. But you can’t sharpen it and expect it to maintain its point for as long as a charcoal pencil.
Hence you may need to work bigger because your line width will usually be a lot fatter.
It can be pretty messy if that sort of thing bothers you. Chalk and soft pastels are nice for gesture too, as you have more colours to choose from.
Graphite pencil
Graphite pencils I treat in a similar fashion to charcoal or conté pencils in that I sharpen them with a blade, not a pencil sharpener.
Just like charcoal, you get different ranges of hardness. Usually for gesture drawing, I use soft pencils.
The sharp point of a pencil can be a little harsh for newsprint paper. And the lines a bit too ‘silky’ and feint.
In that case, I prefer a more glossy paper like cheap cartridge paper.
Personally, I don’t feel the immediacy that I do with a charcoal pencil while doing gesture sketches. I prefer pencil for the longer poses because the medium lends itself to drawing much finer detail.
You can also get woodless graphite pencils, including thick stumpy ones,which I think are quite nice. But I still personally prefer graphite pencils for long life drawing poses.
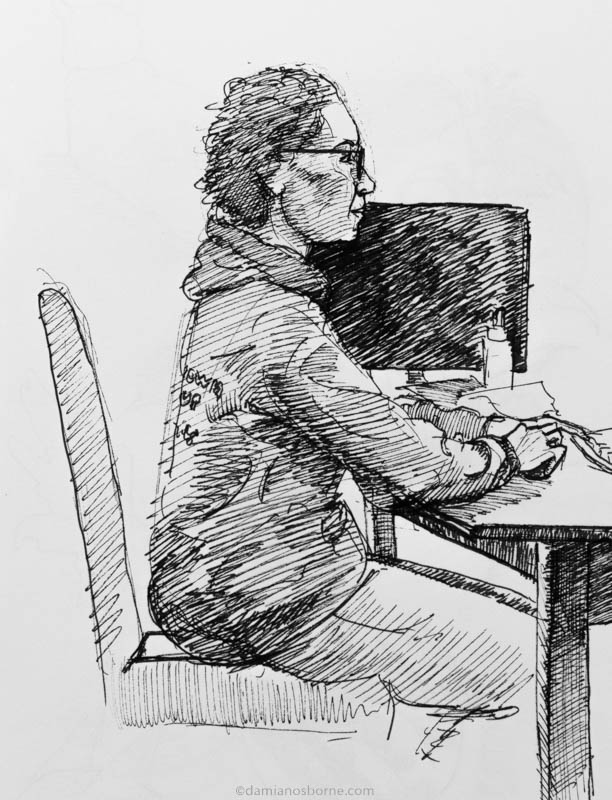
Pen
Pen is a lovely medium for gesture drawing. It’s a pleasure to be able to grab an everyday ballpoint and scribble gesture poses in a notebook. It lends itself to very quick drawing.
Archival micron pens come in many different nib sizes and are great for line art. Then there are brush pens, fountain pens, markers etc. There are so many types and brands of pens available.
It might take a while to figure out what style of pen you like best. And what paper produces the desired effect with that particular pen.

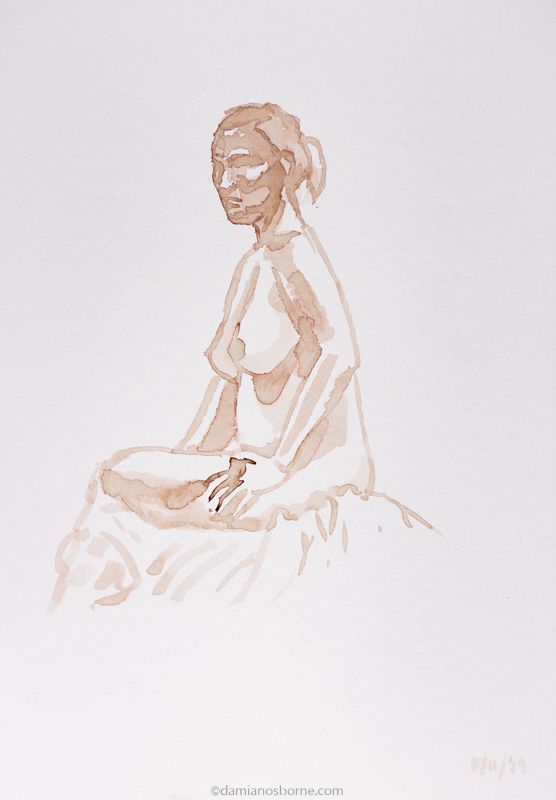
Ink and brush
Some people in my life drawing class enjoy drawing the figure with ink and brush. This is also a very special medium and quite tricky to master. Dipping the brush in a pot of ink reminds me of those old Chinese calligraphy master brush drawings.
I love the deep broad tones rapidly achieved with the brush. And you can vary the tonal depth by diluting the ink with water. The splatters of ink on the paper add a charming character to the drawing.
Brush drawings take a lot of confidence and patience to master. They produce especially vital and dynamic gesture poses.
I particularly like the more traditional black Indian ink, sepia and nut inks.
Watercolour
Watercolour is another expressive medium which can be used on its own, or in conjunction with inks, pens, graphite and charcoals.
Using watercolour for quick gesture sketches can be a little tricky though. You’ll need a good quality natural brush that can hold a lot of water. Such as a large mop brush, a traditional Chinese brush, or a sable.
You won’t have much time to keep mixing your paint or loading your brush. So it’ll be a matter of putting your brush to paper and drawing in one go.
You’ll need better quality paper that can hold a wet medium. And you can pretty much mix whatever colour you want or have available.
Watercolour is similar to ink and brush in it’s manner of application. It’s also a very dynamic medium for rapid gesture drawings.
Wet mediums are a little different in character to dry mediums. Wet mediums lend themselves more to tonal variation than to line detail. And you can really vary the edge control of your drawings with wet mediums.
Soft, washed out edges give a sense of movement and rhythm. Sharper, harder lines suggest solidity, gravity and strength.
There are also watercolour pencils available which are pretty cool. When dry, they act as any normal pencil crayon. But when wet with a brush, it gives beautiful washes like watercolour.

Some examples of Old Master gesture drawing
Here a some of my favourite gesture drawings by famous artists of the past. I particularly love them for their looseness and confidence.
These gesture drawings hold so much character. One feels like one can get into the mind of the artist while they were drawing. The scribbles and mistakes, the ‘feeling out’ of the forms, the brilliant passages of draughtsmanship, all add to their charm.
It’s like coming across a rough draft of a personal letter written in the individual handwriting of the writer, and reading the emotions and thoughts therein.


Gesture drawing inspiration
The great thing about gesture drawing practice is that it doesn’t take very long, so you can do it for a few minutes everyday. Try set up a daily drawing challenge for yourself. Say 30 days of gesture drawing. And see how your drawings become more intuitive and looser generally.
As the artist and teacher Robert Henri said:
It’s harder to see than it is to express.”
But I consider gesture drawing to be a bit of both. It’s teaching yourself to see quickly. Then putting it down on paper as expressively as possible. With a few minimal, economical and vivacious gestural lines.
Now that I’ve hopefully inspired you to start or continue to work on your gesture drawings, I wish you much enjoyment and breakthroughs on your artistic journey.
If you want to see some of my really bad gesture drawings, check out Those Bad Drawing Days where I basically just have to pull myself towards myself and try to deal with overcoming a bad drawing day.
Please write a comment below if you have any thoughts or questions about gesture drawing.
Check out some of my figure drawings here.

- What’s the Point of Creating When No One Cares? - 24th August 2025
- Fantasia No.6 in G minor (The Cockatrice) - 3rd May 2025
- Rebirth: Starting Over as an Artist — Part 1 - 17th April 2025
This is a very good and helpful article. Thank you for inspiring me. Rest assure that I will share what you have written here to my students.
More power to you!
Sincerely,
Ms. Ems
Hi Emma, thanks for the sweet comment.