
Making Bone Black Oil Paint
— The Alchemical Journey Series —
- 1 | What is bone black pigment?
- 2 | How long does bone black oil paint take to dry?
- 3 | When was bone black first used?
- 4 | Bone black vs ivory black
- 5 | How does bone black oil paint compare with other black pigments?
- 6 | What does bone black symbolise?
- 7 | What equipment will you need to make bone black oil paint?
- 8 | How do you make bone black oil paint?
- 9 | What are some examples of bone black pigment used in art?
In this new series, The Alchemical Journey, I begin with making bone black oil paint. Bone black is the first pigment in my quest to make my own oil paints, because black represents the first stage of the Alchemist’s journey, the Nigredo.
You can check out the stages of my self-portrait painting — Nigredo — and how I used these pigments for this symbolic painting.

What is bone black pigment?
Bone black is a permanent pigment made from charring animal bones in an oxygen-poor environment (calcination). It usually makes a deep warm brownish-black in oil paints, although this depends on the temperature that the bones were calcined at.
Bone black oil paint has excellent lightfastness, has a slightly gritty texture and is perfect for glazing in oils due to its transparency when thinned.
It also has a strong tinting strength when mixed with other colours, and makes a useful neutral grey when mixed with white. It is chemically compatible with all other pigments.
Bone black has a very high covering power, is chemically inert, non-toxic, and unaffected by light, air, alkali or acids.
The pigment is also extremely oil absorbent. I found that I needed a ratio of one part pigment to 1.86 parts cold-pressed hand-refined linseed oil.
Bone black contains about 10% carbon, 84% calcium phosphate and 6 % calcium carbonate (with traces of calcium sulfate, magnesium phosphate, and calcium sulfide).
It has the chemical formula of Ca3(PO4)2 + CaCO3 +C.
Bone mineral (up to 70% of bone material) is also known as hydroxyapatite, which is basically calcium apatite (calcium and phosphate minerals) with the formula Ca5(PO4)3(OH).
For reference, see Colourlex.

How long does bone black oil paint take to dry?
Some say bone black is a slow drier. I found that my own homemade bone black oil paint in hand-refined linseed oil dries within 2-3 days, depending on how thickly applied. That’s without any added siccatives.
So I’d call it a medium drier.
Some brands of paints take weeks to dry, and others seem never to dry. It depends on the kind of oil binder that’s used. Surprisingly, many well-known brands of oil paint even use sunflower oil in their tubed paints to cut costs.
The commercial brands usually have added driers or siccatives and many artists recommend using an alkyd medium such as Liquin to improve the drying time.
As for myself, I try to avoid using alkyd mediums, as well as solvents in my painting sessions now, and just stick to the original practices and materials that the old masters used in the past.
When was bone black first used?
Bone black has been used as a pigment for thousands of years, dating back to the Paleolithic Period, when it was used in cave paintings.
Charred animal bones from cooking fires made an easily available pigment for drawing on cave walls.
It was also used in the tomb and wall paintings by the ancient Egyptians, who learnt how to grind the pigment with gum arabic, hide glue or egg emulsion to make paint.

Bone black was used by the Ancient Greeks (Apelles) and Romans, for their murals, cosmetics, pottery and sculptures. Later, it was used in Medieval times for lettering and watercolour paints in manuscripts. Artists of the Middle Ages believed ink derived from elephants (ivory black) could ward off evil.
As watercolour and egg tempera gave way to oil painting in the Renaissance Period, bone black oil paint was used by many of the old masters — from the workshops of Cennino Cennini and Leonardo da Vinci, through to Caravaggio, Rembrandt, Vermeer, Manet, and up to today’s times.

Bone black vs ivory black
The modern tube version of ‘ivory black’ one buys in the art store is a bit of a misnomer. It’s illegal to import ivory and use it for commercial purposes. Thus, it is in reality bone black, usually made from charred bovine or porcine bones.
Real ivory black hasn’t been produced since the 1940s, except in minor cases.
Apparently, Siberian mammoth tusks are still being used, and now with the thawing of the tundra due to climate change, more and more mammoth skeletons are being discovered. (There are estimated to be more mammoths buried under the permafrost than there are live elephants in the world. Sad.)
Genuine ivory black is also made from calcining old ivory piano keys.
In the past, horn and antler bones were used too, also known as Hartshorn black.
The terms ivory black and bone black are used interchangeably these days. But real ivory black made from elephant tusk is said to have a higher percentage of pure carbon (20%) and is, therefore, a more intense velvety black and more transparent. I’ve never used real ivory, so I wouldn’t know.
How does bone black oil paint compare with other black pigments?
Bone black is:
• A good all-purpose black, good for colour-mixing as well as glazing. Does not over-power colour mixes like carbon black or lamp black are prone to do.
• Generally a warmer black than carbon black and lamp black. Sometimes warmer than Mars black, but not always.
• A slightly lighter, less intense black than carbon black and lamp black, though a deeper, more glossy black than Mars black (which can sometimes dry quite matt).
• Generally more transparent than carbon black and lamp black, and a lot more transparent than Mars black (which is quite opaque).
• A black that usually has larger pigment particles and therefore has more of a subtle texture than carbon black, lamp black or Mars black.
• Very oil absorbent like carbon black and lamp black, whereas Mars black is generally leaner.
• Is weaker in tinting strength than carbon black or lamp black, though sometimes weaker or stronger than Mars black, depending on the brand or quality.
• Is more durable and has better film strength than carbon or lamp black. Mars black is the most durable.
• Is faster drying than carbon or lamp black, but still dries slower than Mars black.

What does bone black symbolise?
Bone black has a very personal and deep symbolism for me. It’s a pigment that represents, well, obviously darkness, but also death, putrefaction and mortification, fertility, fecundity, rebirth, emptiness, perhaps something occult, and spiritualism.
It represents fire and carbon, ashes, annihilation.
Bones are fascinating and a reminder of both life and death. Of animals and of the natural world, and that all things in the Creation must eventually die.
The first stage of the alchemist’s journey is the Nigredo. Nigredo means total blackness. Death, breakdown, destruction.
It is all the more powerful a symbol when the black pigment is made from carbonised bone.
Black is the total absence of light or colour.
Black represents this first stage. The total breakdown and death of the old self. Where all is black and you simply know nothing.
Within the darkness is the potential for a new life. A rebirth.
Just as Jesus was crucified, abandoned and suffered the Nigredo, so the symbolism holds also the promise of a new life.
To read more about some of my thoughts on the Nigredo, go to Thinking Through the Nigredo – The Union of Darkness and Light.
It’s a surrendering to the unconscious. Doing away with complexes and ideas about myself I once believed in. This is the necessary psychological stage of burning everything away, before one can form a new, clearer self, free from illusions.
For the Alchemists, the breakdown and release of chemical compounds by fire had a deep significance, and mirrored the psychological and spiritual changes or stages — a journey through the underworld, like Dante, Christ or Odysseus — before reforming in ever more purified forms.
The chemical reactions that took place within the retort or furnace, represented the same annihilation and rebirth of the soul or psyche itself.
The Alchemists were the first scientists, and to them, all aspects of science and nature had a spiritual, allegorical and universally connective significance. Unlike the dry, barren empiricism and materialism of science today.
For more inspiration see Colour My World, Alchemical Psychology, Part I – Black.
What equipment will you need to make bone black oil paint?
You’ll need:
• Enough bones to fill a small pot or metal container. (Collect ox, poultry, sheep etc. bones after meals if you’re a meat-eater, and store in the freezer until you have a sufficient quantity. Or get bones from your local butcher.)
• A cast-iron pot or metal pipe with a lid for calcining the bones in a fire. (Must be able to withstand 10 hours at over 600° C.)
• Aluminium foil is optional, it may help to create more of an airtight container, but isn’t strictly necessary if you have a tight-fitting metal container lid.
• A furnace, fire pit or barbeque/braai.
• Plenty of fuel (wood and coal) to maintain a fire for 10 hours. And all the necessary fireside equipment: matches, kindling, tongs, axe etc.
• Mortar and pestle. (A heavy-duty granite one is the best.)
• Sieves and fine strainers for straining the finer pigment particles. (A tea strainer works quite well. US 100 mesh gauze is even better.)
• Two or three plastic or Tupperware containers (preferably with lids) to keep your pigment in and separate by grade and particle size. (Yogurt or feta cheese containers work well.)
• A tall glass vase for washing the pigment, an empty can or cup, and a large flattish bowl or plastic container for drying the pigment in.
• A 1L plastic jug or bucket with distilled water.
• A turkey baster/siphon.
• A large, flat slab for grinding the pigment on. (Bone black is quite soft, so a heavy-duty glass pane, large ceramic tile, or even a marble slab would hold up to the mulling and grinding, but a granite slab is always the hardest and the best.)
• A glass muller. (You can get away with using a flat-bottomed glass or glass candlestick since bone black is soft enough. However, it may not be the most comfortable to work with.)
• Empty aluminium paint tube. I used 60ml paint tubes, but you can use larger (100ml) or smaller (37ml) and adjust your ratios accordingly. (You can also use syringes if you don’t have aluminium paint tubes. Just find a way to close the tip to keep it airtight.)
• Around 60ml of refined linseed oil per 60ml paint tube. (Cold-pressed hand-refined oil is the best in my opinion, but you can use any cold-pressed artist brand linseed oil.)
• Tablespoon and 5ml dropper. And a kitchen scale if you feel you need one.
• Painting/palette knives for scraping the pigment together and for filling the paint tube.
• Rags or paper towel for wipe up. (And a bottle of mineral turps for cleaning the granite slab afterwards.)
• Dust mask if you’re worried about dry pigment dust. (Bone black is non-toxic though, so I don’t usually bother, and just make sure I don’t create a cloud of dust in the first place.)

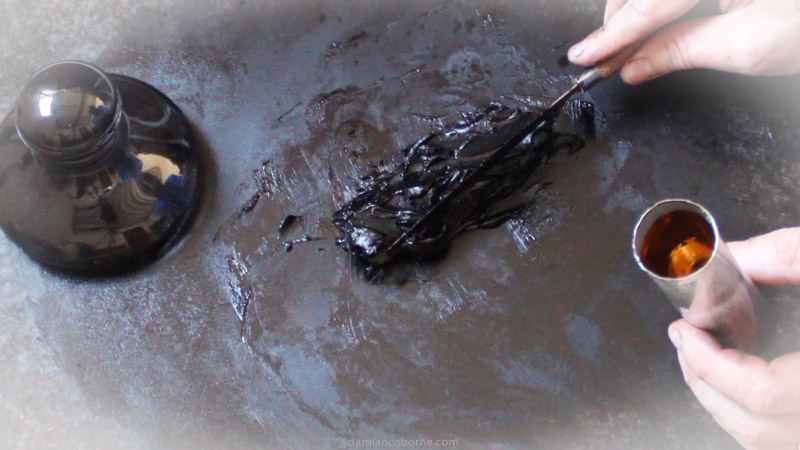
How do you make bone black oil paint?
• Boil the bones until the flesh is removed (it’s easier to use bones that have come from a stew).
• It’s important that the bones are perfectly clean of all flesh and gristle. You may have to soak them in hot water for a while, or use an old toothbrush to get them clean. Now you can leave them in the sun or leave them for a couple of days to dry.
• Pack the bones in a cast-iron pot. Pack them tight so that there’s as little air remaining as possible. Use foil if you want to try to seal it from the air further. Close with a lid.
• Make a fire. When the fire is ready, place your pot of bones on the fire. Make sure you have plenty of wood. You’re going to need it.
• Maintain the fire for around 10 hours. Your pot may even glow red in some places due to the heat. You’ll want to keep a temperature of around 500° C – 600° C. That’s a proper fire with flames. Not a pile of smouldering coals.
• Let the fire burn out and cool for a few hours. Be careful with removing the iron pot. It’ll be extremely hot.
• Make sure your pot is properly cold before checking on the bones. If the black comes into contact with air while still hot, the carbon may burn and your pigment will ruin.
• Now you can check on the condition of your bones. If the colour is yellowish-brown and not a warm to neutral black, the fire wasn’t hot enough, or the bones weren’t cleaned properly. If they were partially burnt, you’ll get an ugly grey. The bones should crumble easily by hand like soft charcoal. If they are still hard, or contain collagen, they weren’t calcined for long enough.
• Grind the bones with a mortar and pestle (a granite one is best). Take your time with this process.
• Make the pigment powder fine enough to go through a tea strainer (which is about 300 – 400 microns/US mesh count 40). If you have 100 mesh gauze, that’s even better. Filter your pigment and wear a mask if you’re worried about the dust.
• Now it’s time to wash your pigment. Mix your pigment in a large bowl with distilled hot water (not too hot! — about the temperature of a hot bath) and stir it up, dissolving the pigment in the water. You’ll notice particles of a metallic-like sheen floating to the surface. I think this is bone ash or calcium phosphate (phosphate of lime)*.
• While the pigment is still in suspension, pour the water into a tall vase. Then leave the pigment to settle over a few days. The impurities will float, while the pigment will eventually settle to the bottom.
• Once the pigment has settled at the bottom, leaving clear water above, very carefully use a tin can or cup to remove as much water as possible without disturbing the settled pigment. You may need to use a turkey baster near the end. Discard this wastewater.
• Pour the remainder of the pigment into a large, shallow bowl. You may need a little more freshwater. At this point, you can separate the finer pigment from the heavy particles through a process called levigation. While the pigment is still in suspension after stirring, wait a few minutes while the heavy particles sink. Then pour the top bit containing the floating finest particles into a separate open, flat bowl where you can allow the water to evaporate and the pigment dry for a few days.
• To be really sure there’s no water left in the pigment after drying, as bone black is quite hygroscopic, you can heat the pigment in a suitable vessel in the oven at over 100° C for an hour.
• Now that you have ‘bone dry’ pigment (see what I did there?), you can regrind it in the mortar and pestle to get rid of clumps. Then measure out 3 and a half tablespoons of pigment for a 60ml paint tube.
• Place your measure of pigment on a granite or glass paint-grinding slab and make a shallow well with the spoon. Add 15ml of cold-pressed linseed oil and mix the pigment and oil together thoroughly with a palette knife.
• Once the pigment has soaked up all the oil, repeat the process with another 15mls and mix. You may need to do it a third time. Bone black is quite oil thirsty.
• Move your pile of freshly mixed paint to the side of the grinding slab. Then select just one palette knife amount (or roughly a tablespoon amount), bring it to the middle of the slab, and begin mulling with your glass muller.
• This is the most laborious part and must be done properly. At first, the paint seems very oily and loose. But after mulling for a while, it begins to stiffen up into a thick paste. Make sure you’re able to mull the paint really thinly on the granite slab. Otherwise, if you have too much paint to deal with at once, it won’t achieve the required thinness for there to be enough friction against the surface of the slab. And the particles of pigment won’t be sufficiently coated in the oil.
• Work the paint with the glass muller bit by bit. Work in small circular movements in either a clockwise or anticlockwise direction, with occasional figure of eight gestures. Once you’re satisfied with the batch, move it to the side and select another spoonful of unmulled paint. Repeat. This may take you a couple of hours.
• Once you’re done mulling, gather the paint together in a pile. If you need more oil to loosen the paint up, use a dropper and use the oil sparingly. You don’t want too much oil. Use your judgment here. This is the difference between reading formulas in books and doing it yourself. What kind of paint do you prefer to work with? For me, it must be fairly smooth without being lifeless and have the consistency of thick toothpaste.
• Now that you’re satisfied with your freshly-made oil paint, gather it all together in a pile and start putting it into a metal paint tube (or syringe if you don’t have an empty tube). It helps to have two palette knives (one of them long and thin) to scrape against each other for manipulating the paint. Your fingers are probably going to get dirty, so don’t touch your face or your phone.
• Make sure the lid of the paint tube is on. Then fill the tube with paint from the open end (which is actually the bottom of the tube). Make sure you tap the lid of the paint tube gently against the surface of the granite slab so that the paint drops down and that you don’t have any air gaps inside the tube. Repeat this process of adding paint with your palette knife and tapping until you’ve filled the tube with paint about 2 thirds of the way.
• Now it’s time to close the paint tube. Squeeze the open ends of the tube together gently with your fingers. Press down gently so that the paint is compressed towards the lid of the tube. You will probably need to wipe the bit of excess mess with your paper towelling.
• Use the edge of your palette knife to fold the open end of the tube over, around 2-3mm from the end. Clean with paper towelling. Then fold it over again. Make sure it’s neat and properly pressed together or sealed.
• Admire your tube of handmade bone black oil paint.
* According to Josef Bersch, 1840-1907 in ‘The manufacture of mineral and lake pigments’:
Bone black consists of bone ash upon which fine particles of carbon are deposited. Bone ash is easily soluble in hydrochloric acid; if finely ground bone black is treated with this acid and the residue washed with water until the washings are neutral, a residue of extremely soft and pure carbon is obtained, which has a deep black colour and, in consequence of its fine division, very great covering power.”
I wasn’t really that interested in washing the pigment with HCl. The shiny bits of calcium phosphate didn’t make that much of a difference for me.
The paint was still excellent quality with a deep warm black. And it made a nice, clean neutral grey when mixed with a white tint.
Further in the book, Bersch says:
A small quantity of the black under examination is intimately mixed with a white pigment; white lead or zinc white is very suitable. If the mixture has a pure grey shade, the black may be regarded as of good quality, but if it contains brown substances the mixture has an indefinite, dirty shade instead of a pure grey. This is a sure sign that the black requires further purification.”
For more information on how different temperatures affect the quality of bone black pigment see culuralheritage.org.
For more reference, see webexhibits.org
What are some examples of bone black pigment used in art?
From as early as the Paleolithic Period, carbon-based blacks such as bone and wood charcoal blacks were used for cave paintings and drawing, such as at Chauvet-Pont-d’Arc cave in France. Cave artists mostly used manganese oxide blacks (black ochre) in their cave paintings at Lascaux and other famous sites.

The Romans used bone and ivory black in their frescos, as shown in the ‘Emperor’s Study’, House of Augustus, Palatine Hill.

The famous 4th century BC Greek painter Apelles used bone black in his works.
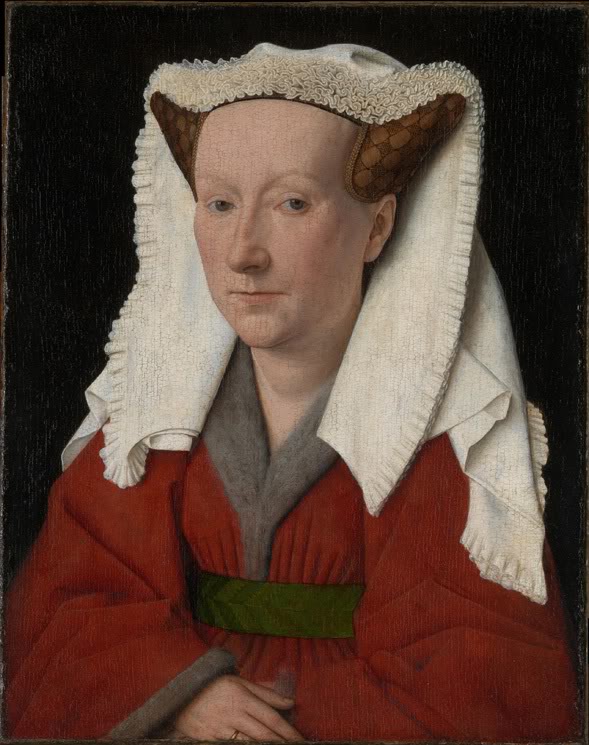
Flemish Renaissance artist, Jan van Eyck, (1395-1441), used bone black in his portrait of his wife, Margaret.
Rembrandt used bone black oil paint often, as part of his general palette.

Vermeer used bone black too.

Despite many of the Impressionists scorning the use of black, Manet used bone black or ivory black quite prolifically in his paintings.

Thanks very much for reading. Please check out the video above to see how I use the traditional method of making bone black oil paint.
If you have any questions or comments, or if you want to talk more about traditional pigments, please feel free to write below or email me.
Also check out the next black pigment I experiment with: Making Graphite Oil Paint!

- What’s the Point of Creating When No One Cares? - 24th August 2025
- Fantasia No.6 in G minor (The Cockatrice) - 3rd May 2025
- Rebirth: Starting Over as an Artist — Part 1 - 17th April 2025
Hi there, this was such an interesting read! Thank you, I found it so helpful. I have one question please. Can the tubes be re filled once the paint has been used? That would be so great, to re-use them rather than wasting them. How long does the paint last by the way?
Hi Deirdre,
Thanks for your lovely comment. Not sure about reusing the tubes. They get kind of messed up when you squeeze the paint out, but you can try. Otherwise, just use syringes from the pharmacy and figure out a lid for them. The paint should last many years in its tube if sealed from the air. I have paints 20 years old and still fine.
Regards,
Damian.
Just wondering, does it have to be linseed oil or can I used refined duck fat as the mixing base?
Yes, you can certainly use refined duck fat. Conservators will thank you 200 years later. Just make sure you leave a few duck feathers in the pigment to help with binding and to leave an interesting impasto texture. I find baby fur seal after being freshly clubbed to death makes the best fat for oil painting.